MA in Education

I recently began an MA in Education. The MA is delivered by the Westminster Institute of Education; part of Oxford Brookes University. A modular course; it begins with the Postgraduate Certificate in Advanced Educational Practice (CAEP). Made of three modules; accounting for a third of the full MA, the course is delivered part-time with sessions held at my School.

The first module is a School-based Enquiry in which I have chosen to focus on my use of Google docs. As an enthusiast in the use of technology in the classroom; Google docs was one such technology that I believe had a significant impact on my student’s progress last year. It is my intention to try to quantify that by completing research into its impact on an individual class’ progress this academic year.

Building on the work that I did last year and recent improvements made to Google docs I am going to limit my research to one specific use of Google docs: How does it improve the quality of one-to-one assessment for my students? At the moment I am in the latter stages of planning this research. You can view my progress here.

The other modules that I will be undertaking this year are Assessment for Learning and Developing E-Learning.

Ii is my intention to document my progress throughout each module on my blog. To do so, I have created a dedicated page here. I hope, that by documenting it publicly, it will help me keep to a strict schedule while also providing opportunities for wider input and feedback on my research.

To maintain my organisation and productivity I have installed Evernote on my MBP, Android phone and in Google chrome to store and record notes. I have also linked my Oxford Brookes Library account with Google scholar to ease the logging of journal articles and essays. I will be mainly downloading these to read on my Sony eReader allowing me to attach notes. Finally, I will be tagging posts and tweets related to my research with #mainedu.

Share with Delivr

I’m taking a break from writing a post about QR-Codes to share a little HTML and offer my first impressions of Delivr – a new tool that has been making the rounds on Twitter this past week. In a nut shell, Delivr combines the URL shortening/tracking services of a bitly.Pro account with a QR-Code generator such as qrcode.kaywa.com and then adds a couple of extra functions for good measure.

For those of you who have not heard of Delivr or have not tried it yet, here is a brief look at what it offers.
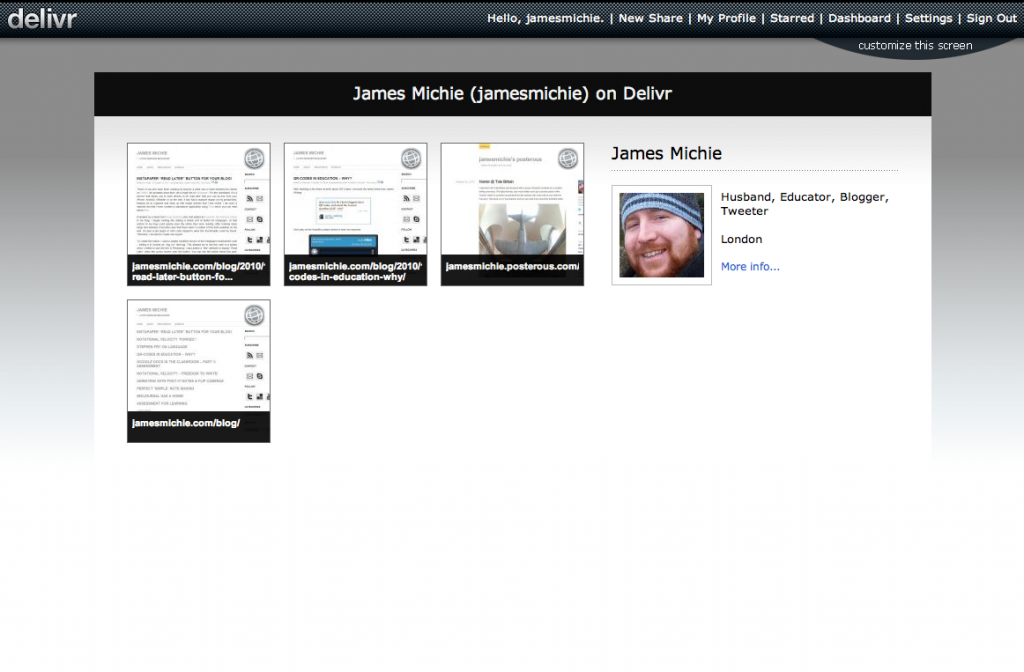
Signing up to Delivr gives you a variety of features including a profile page. However, unlike many other URL shorteners, rather than a simple text based list of the links you have shared, you get a series of thumbnails. I like this a lot as I am a big fan of the visual web. What’s more, it potentially offers a unique opportunity to share a series of links in a quick and visual way. For example you could create an account for a presentation and have all of your links on one page. This could then be shared with everybody in one go by displaying or tweeting a single URL. Others can easily share the links and when you load each one up their is a QR-Code that people can scan. I think this could be a very interesting way to present and with some events coming up early on next year I may give this a go.
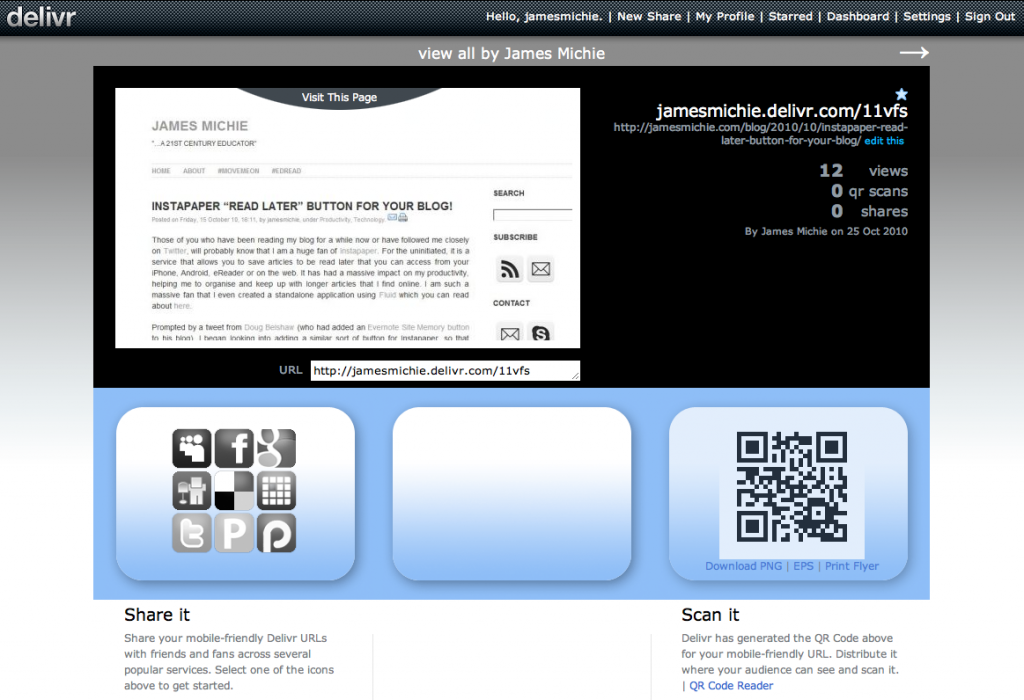
Each link that you share also gets a unique page as part of your Delivr account (indicated by an asterisk at the end of the URL). This page is mobile friendly and contains a variety of useful material. In the top left of the page you there is a good sized preview of the link you have shared. In the top right you can see the URL of the link. The link is made up of two parts – your profile name and a Delivr short URL. You can choose to share the whole thing or simply remove your profile name and just share the short URL. For example, both of these URLs work and will take you to the same page: http://jamesmichie.delivr.com/11vfs or http://delivr.com/11vfs.

In the bottom left of the page there is a pannel that allows you to share to multiple places including Twitter and Facebook at the click of a button, meaning you do not need to open a new tab. In the bottom right of the page their is the QR-Code that has been generated. Below it there are a few options as to what you can do with the QR-Code. It is here that Delivr goes a bit further than qrcode.kaywa.com in that the QR-Code features are more extensive. Firstly, you are not as limited in how much text you can embed inside the QR-Code and Delivr also does some funky things with Flickr images, YouTube videos and Google maps.

Here is an example of a YouTube video I have shared with Delivr. Not only can I share the short URL and get a JPG of the QR-Code but I can see a preview of how it will display on mobile devices:
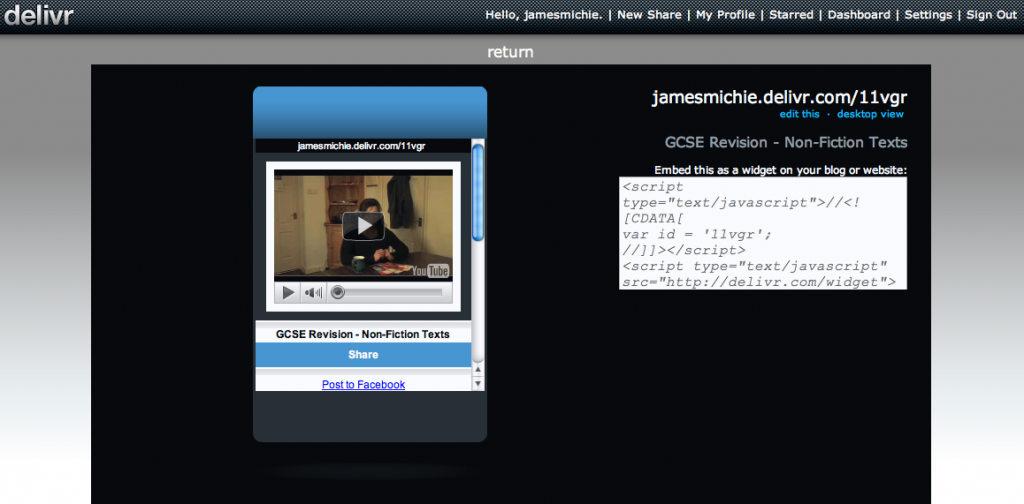
You can also embed the mobile view on a blog or website as a widget and you can print out this handy flyer with the QR-Code featured on it:
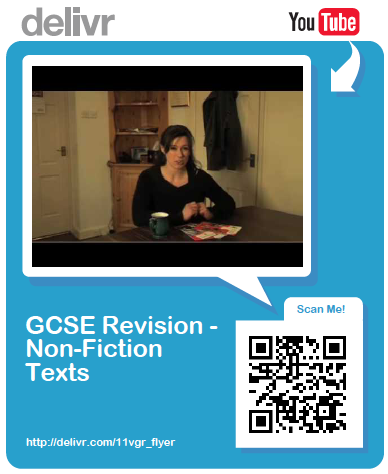
Included on the flyer is a still shot from the YouTube video and a description of what the video is. This is great for sharing info at school as the flyer exports as a PDF which can then be embedded on a blog/website, uploaded to a VLE or printed to be displayed in classrooms. I will be definitely making use of this feature in the coming months in both English and Media Studies.

Other features that you get from signing up to Delivr are very similar to those offered by bitly.Pro.
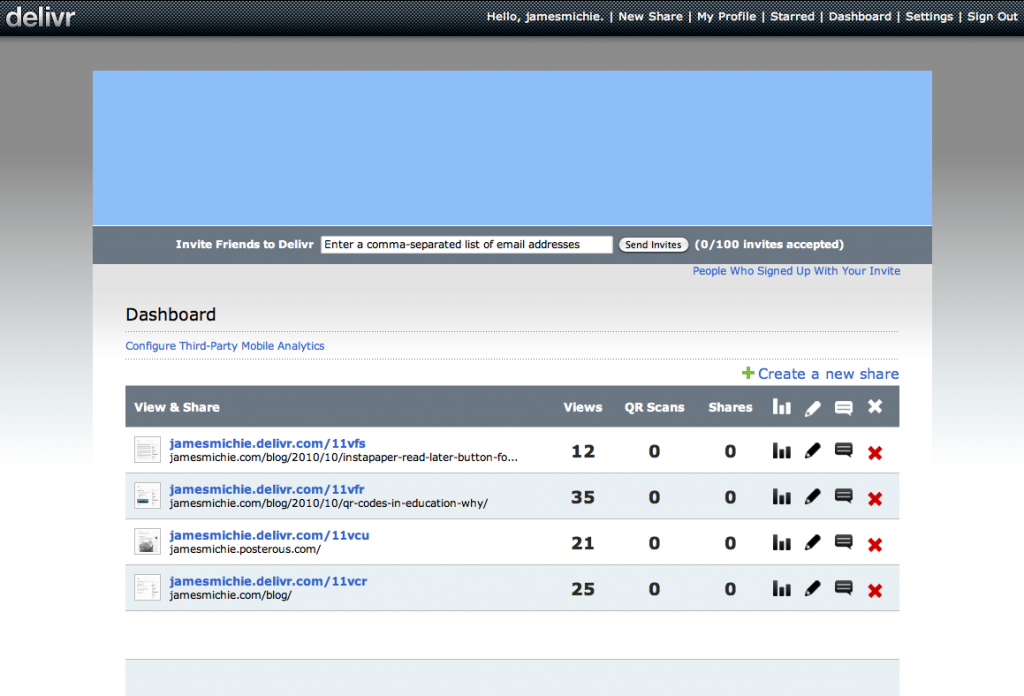
You have access to a dashboard which lists all of the links that you have shared. From here you can manage your shared links with the ability to delete, edit, read comments and access analytical data. Also, there is an RSS feed of your shared links and you can export all of your data stored on Delivr as an excel file.
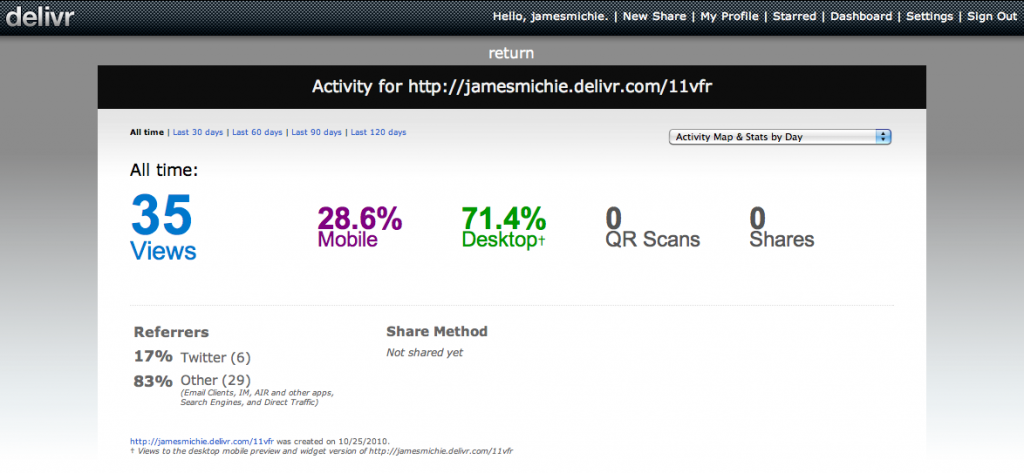
The analytivcal information is useful giving you a clear picture of how the links have been accessed, shared and if the QR-Code has been scanned. As I begin to explore the use of QR-Codes more readily this information will be very helpful.

Another potentially useful facet of Delivr is that people can follow your account in a very similar way to following someone’s Delicious account, where by you can see an updated list of links that have been shared. Further features include the ability to host your Delivr account under your own domain and to personalise your profile page with extra information and a background image – making the Delivr experience even more personal.

What’s more the web based interface has been extremely well thought through formatting itself perfectly on my HTC Wildfire. I could browse mine and others shared URL’s with ease, follow back friends who had begun following me and re-share links straight to Twitter, via Email or bookmark to Delicious. Once again, as with many apps, it is ease of use that will keep me coming back, particularly as I am using my phone more and more to access the World Wide Web.

Delivr works well via the web based interface but even better via its handy bookmarklet which you can drag to your bookmarks bar in your browser. This allows you to share links directly from the page that you are on while surfing the web.

Having been instantly impressed, I wondered if I could add a button to my blog so that people could use Delivr to share my posts without leaving the post page. I took a look at the code and saw that it was very similar to the code used in the Instapaper Bookmarklet. As I did with Instapaper, I adapted the bookmarklet code and then found an image to act as a button. In this case I used Delivr’s Twitter Logo as the image source reducing it to 32 x 32 pixels. You can see and use the button at the top right of this post. If you would like to add the button to your own blog then grab the following code:

<a href="javascript:%20var%20newscr%20=%20document.createElement('script');%20newscr.setAttribute('language','javascript');newscr.setAttribute('src','http://cdn.delivr.com/js/bookmarklet.js');document.body.appendChild(newscr);%20var%20newcss%20=%20document.createElement('link');%20newcss.setAttribute('type','text/css');newcss.setAttribute('rel','stylesheet');newcss.setAttribute('href','http://cdn.delivr.com/css/bookmarklet.css');document.body.appendChild(newcss);void(0);"><img src="http://jamesmichie.com/blog/wp-content/uploads/2010/10/Delivr.png" alt="Share with Delivr" title="Share with Delivr" /></a>

Instapaper “Read Later” Button For Your Blog!

Those of you who have been reading my blog for a while now or have followed me closely on Twitter, will probably know that I am a huge fan of Instapaper. For the uninitiated, it is a service that allows you to save articles to be read later that you can access from your iPhone, Android, eReader or on the web. It has had a massive impact on my productivity, helping me to organise and keep up with longer articles that I find online. I am such a massive fan that I even created a standalone application using Fluid which you can read about here.

Prompted by a tweet from Doug Belshaw (who had added an Evernote Site Memory button to his blog), I began looking into adding a similar sort of button for Instapaper, so that visitors to my blog could quickly save the article they were reading. After trawling many blogs and websites it became clear that there wasn’t a button of this kind available on the web. No java script plugin or html code snippet to allow this functionality could be found. Therefore, I decided to create one myself.

To create the button, I used a slightly modified version of the Instapaper bookmarklet code – editing it to include an “img src” html tag. This allowed me to link the code to a button which I edited to size (60×60) in Photoshop. I also added a “title” attribute to display “Read Later” when the cursor hovers over the button. You can see the button below this post. Sign in to your Instapaper account and try it out.

If you would like to add this button to your own blog, you can do so by using the code below:

<a href="javascript:function iprl5(){var d=document,z=d.createElement('scr'+'ipt'),b=d.body,l=d.location;try{if(!b)throw(0);d.title='(Saving...) '+d.title;z.setAttribute('src',l.protocol+'//www.instapaper.com/j/WKrH3R7ORD5p?u='+encodeURIComponent(l.href)+'&t='+(new Date().getTime()));b.appendChild(z);}catch(e){alert('Please wait until the page has loaded.');}}iprl5();void(0)" class="bookmarklet" onclick="return explain_bookmarklet();"><img src="http://jamesmichie.com/blog/wp-content/uploads/2010/10/Instapaper.png" alt="Read Later" title="Read Later" /></a>

I chose to insert the code in the “single.php” file of my WordPress blog so that it appears on the top right of the post pages but not on the home page.

I hope that you find this useful. If you make use of the code and/or edit it to suit your needs, please let me know by leaving a comment below.

Notational Velocity ‘Forked’!

Having written a post only a few weeks ago about Notational Velocity, I was elated to read a brief posting from Shawn Blanc about a ‘forked’ version of my favourite writing app. The altered and improved version was developed over at the elastic threads blog. It adds the following UI goodness to an already fantastic app:

  • Fullscreen
  • Switch between horizontal/vertical layout of the notes list
  • Show/hide the notes list
  • [Update] Low contrast and user customizable themes

Each of these useful additions (I’m making use of the fullscreen mode as I write this post) come with keyboard shortcuts, maintaining the simplicity and philosophy of the original app.

There is also a menu bar function added along with the ability to hide the dock icon. This I am not so fussed about as I hide my dock any way and I have mastered the shortcuts for navigating around NV quickly.

The horizontal list of notes however is excellent, altering the UI to look more like an iPad app, which is highly pleasing!

Here is a [updated] direct link to download the ‘forked’ version [2.0 β3et (6.67)] of NV. Enjoy!

Notational Velocity – Freedom To Write!

Very recently, Leo Babauta (he of zenhabits.net and mnmlist.com) published a post about his use of the free Mac application Notational Velocity. In the post he discusses how the app has become his number one writing tool. I also mentioned NV in a recent blog post and even though I have only been using it for a few weeks, I find myself using it far more than I expected to. I began by using the app to make notes and simple lists but have found myself drafting blog posts, letters and recording ideas that I can return to later. Therefore, I felt that I would offer some further refelections and explanation of why I like the application so much.

Notational Velocity is one of the most uncomplicated and yet most powerful tools I have made use of.

Simplicity

First and foremost it was the simplicity of NV’s design that grabbed my attention. The user interface boasts a clean writing space, free of the clutter you find in so many desktop text editors. There are no buttons as the app relies on simple search operators and a series of built in shortcuts (not an extensive list) to operate. At the top of the app is the location bar (which you can return to at any time by clicking cmd-L) – here you add new notes (type a title and hit return) and/or search for and within notes. ‘Search’ functions much like Google instant, sifting through your notes, revealing the results as you type. Below the location bar is your list of notes, sortable by ‘title’ or ‘date added’. And below this is the note body, an open space, ready to be filled with text and nothing else. I, like Leo, have expanded this area to make it more useful for writing.

Beneath the simplicity of the UI are some very straight forward but useful inner workings. By entering your Simplenote username and password, notes are synced to your Simplenote account. It’s free and updates regularly. Also, built into the app is an auto-save function meaning you never have to worry about losing what you have written – I have mine set to sync every minute as I write at quite a rapid pace. Finally, you can (if you wish) tweak features like the typeface and font size. However, I was more than happy to stick with the defaults when after starting up the app for the first time I was overjoyed to be greeted by Helvetica, size 12.

Power

Woven within the simple exterior and inner workings of the app, NV holds immense power: the power to free you from distractions, allowing you to focus on your writing. As I’ve already mentioned my original intentions were to simply use NV to keep lists and notes that I could mail to myself or expand upon in Google docs. However, the app has become far more than a simple note making tool. I am using it to write almost everything – at least in the early draft stages. Why? Becuase the simplicity of the UI allows me to focus on the content of my writing. Having resized the app from its default setting I have created a focussed space for me and my thoughts. It is lovely to get my ideas down, free of the tools and buttons used to tinker with font size or to insert images. My time and attention remain firmly focussed on the task at hand: writing.

After just three weeks I am now using Notational Velocity for the following:

Notes

  • Mentor meetings – with my line manager and those that I take during meetings with my own mentees
  • Subject Leader meetings
  • Department meetings – my prepared notes plus those I add during the meeting
  • HTML code snippets – that I use in my blog posts

Lists

  • Work To Do – a constantly updated list of day-to-day tasks
  • To Read – a list of books I wish to eventually buy/download and read

Thoughts and ideas

  • Blog ideas – a continually changing list of potential posts that increases and decreases as I have new ideas and publish posts
  • Educational ideas – possible activities, uses for tech etc, that are not yet fully formed but have potential for development

Blog posts and other writing

  • Blog posts – currently, I have 4 blog posts (not counting this one) roughly drafted
  • Letters – I drafted a recent news letter and am currently recording notes for a second installment to be sent out at the end of term
  • Resources – I am also part way through drafting an exemplar response to an an activity I plan to assign my Year 10 English class

And that’s the thing, I really have started using NV for everything. I feel liberated, free of distraction, free to focus on my writing. Added to which I have become even more productive, writing everything from within one space – no switching between apps for different tasks. I do it all here, only moving to Word or Google docs when there is a need for formatting or the addition of other media. Those (for me at least) are the after thoughts; the window dressing – it’s the words that do the talking!

In a world dominated by tools and products that allow you to do multiple things at once, Notational Velocity is a reminder that sometimes simple is best.