Vale a pena ficar de olho nesse blog!

“Vale a pena ficar de olho nesse blog!” or to those of us who speak English: “It’s worth taking a look at this blog!” Thank you to Jan Webb for including me in her list of 10 blogs that are worth taking a look at.

If you are included below and wish to take part in the project; simply copy the image from above and the title of this post. Make a new post on your own blog; including them, and your list of the 10 blogs you think others should take a look at.

Okay. On with my list:

Doug Belshaw is an inspiration to many of us who marvel at his insane levels of productivity! His blog is always insightful, always useful and being someone who loves clean aesthetic design, his blog is beautiful to look at/read. Doug and his blog were one of the final catalysts that led to me writing my own blog and I have tried to borrow some of those design aesthetics in putting together my blog.

Richard Byrne seems to be a man on a mission to catalogue and provide his PLN with an entire library of educational tools, apps, software and websites; keeping them innovating in the classroom until the end of time. He is the most prolific blogger in my Google Reader. Simply awesome!

Tom Barrett quickly became one of my heroes when I joined Twitter. He will retweet you, recommend you and help you get your PLN off the ground. His posts centre around educational technology posting about great apps and tools. However, as a leader in the edtech community, the true worth in Tom’s blog comes from his ideas and thoughts about edtech itself and the pedagogy involved. To see what I mean check out this post called “Whispering Change”.

James Clay‘s blog is another great edtech read, particularly his series of posts titled “100 ways to use a VLE”. As an avid user of my schools VLE (Moodle) I find these posts exceptionally useful whether they introduce a new idea, reinforce something I have already been doing or remind of something I had forgotten about. This brings me nicely to the next two blogs which are also Moodle related.

Ian Usher is Buckinghamshire’s eLearning co-ordinator and helped set up our VLE. He is a “Moodle” afficinadao and his blog tends to centre around this – exploring the use of Moodle across a series of schools which he has worked. He also blogs on other edtech related ideas, pedagogy and tools. And as an added bonus, if you subscribe to his blog feed you will also get regular updates from his delicious links.

Kristian Still is someone I have gotten to know recently; he, being directly involved in this years Moodle Moot. (You can read his guest posts featured on Moodle Monthly about the #mootuk10 here: Day 1 and here: Day 2) Kristain posts regularly on a wide variety of education related areas including edtech, leadership and 21st Century Learning – a topic that is if great personal interest to me as it has been at the forefront of my thinking and classroom practice for the last few years. His writing style serves him well, creating clear and informative posts with a personal conversational tone.

David Mitchell‘s blog is really interesting as he is simply not afraid to try out new and innovative ideas inside and outside of the classroom. Search back through the posts to see how he is getting on with using mobile technology in the classroom, Cover It Live, Voicethread for peer assessment, Twitter and class blogging amongst other things. Reading about his methodology and his sheer willingness to give it a go serves as a constant reminder that you must not stay stagnant as an educator. You must keep looking for ways to improve the learning for your students.

Dai Barnes writes on edtech, pedagogy and innovation. His posts are always stimulating and, like several of the other educators I have included in this list, he is leading the way in thinking about 21st Century Education. His blog is well structured to allow you to find information on key areas of interest including Moodle, eLearning and mobile technology.

Chickensaltash is a great educator who waxes lyrical on day to day learning, edtech and the 21st Century Classroom. His posts regularly end up in my Instapaper account to read later as the guy can write and write and write! Therefore, I often need to save them till I have more time to read them and digest the ideas within.

I have included the Instapaper Blog in this list as Instapaper is my favourite web app of all time. It is integral to both my web work flow and personal productivity. It was the second web app that I used Fluid to turn into a desktop based app and the excellent, regularly updated iPhone app has become my most used app on my iPod touch. You can read my post about creating desktop apps with Fluid (including Instapaper) here. Their recent posts have included many updates on the development of their iPad app which looks stunning…check out the pics in this post. If you love design simplicity like I do you will love the way this app looks!

And that’s it; 10 blogs I think you should take a look at. Please leave comments if you wish and as always you can contact me on Twitter @jamesmichie.

Creating Desktop Apps With Fluid

fluid

My best and most recent tech find for Mac is Fluid. Fluid is an application that allows you to create standalone desktop versions of your favourite web apps such as Gmail or Twitter. Neither of these appealed to me as I have Gmail synced with Mail on my Mac, and on my iPod Touch (I also sync Google Contacts, Google Calendar and my school Outlook account) and I use TweetDeck to keep up with my PLN.

However, there were some web based apps that I felt would be great to have on my desktop due to the fact that it would be good to be able to view them within a separate interface. What’s more after doing a little more research I found that if I used Fluid to create apps I would be able to make use of user scripts to tweak them – that sounded great, so I decided to begin with Google Tasks as I am always looking for ways to improve my organisation and productivity.

Google Tasks

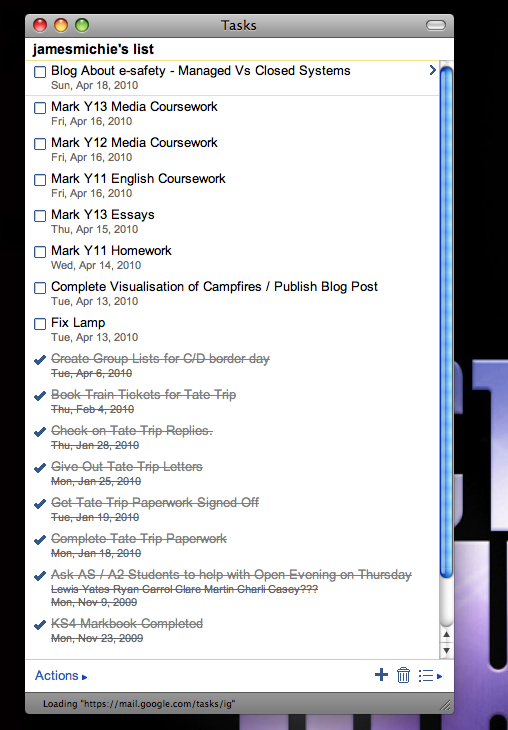
And here it is. It looks clean, signs in automatically and everything works: Adding tasks, adding info, marking when complete, syncing with Google Calendar and therefore Ipod touch.

tasks

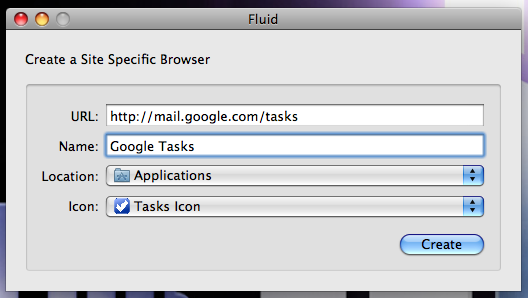
If you would like to do this you need to download Fluid. Once installed, open Fluid. You will see a dialog box (see below) into which you need to type or copy/paste the following URL: http://mail.google.com/tasks. Name the app Google Tasks. Keep the location as Applications. Download an icon to use, I chose one created by Max Headwound on Flickr (image below), found on the Flickr: Fluid Icons Pool. Then click “Create”.  You will see a new dialog box asking you to launch the app. Voilà, you are done!  You can then drag the app from the Applications folder to the dock.

fluid new app creation

tasks icon

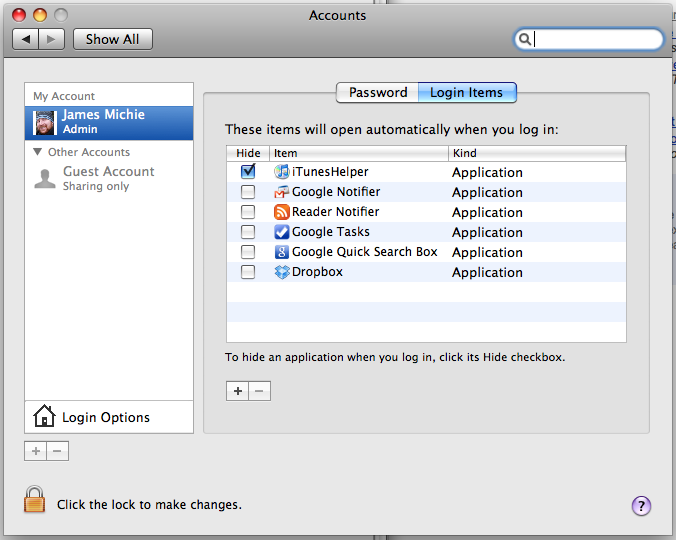
For ease of use I also added my newly created Google Tasks app to my login items so that it would load automatically when I boot up my Mac. To do this go to System Preferences / Accounts / Login items / Click the + symbol and select the Google Tasks app from the Applications folder.

login items

There are also some nice icons available at IconsPedia, choose the icon that suits you! As a Mac user image is important to me so selecting the right icon was as important as choosing which web apps I would turn into desktop apps. My next web based app that I use every day was Instapaper.

Instapaper

The process is the same as before using the following url: http://www.instapaper.com/u. If you have not used Instapaper before, I highly recommend it. It makes up an integral part of my web workflow, something I plan to write more about in a future post.

Instapaper allows you to store web pages and articles that you find to read later. It makes use of a bookmarklet to do this but if you are using the beta build of Google Chrome you can use the Instachrome extension. I have been using this extension for almost a month now and it makes adding pages to Instapaper a breeze.

Instapaper comes into its own if you have an iPod touch as the articles can be synced for offline browsing. As a serious user of Instapaper I recommend the pro version, I use folders and it helps to have them synced, saves having to repeat actions later as everything can be done from the iPod.

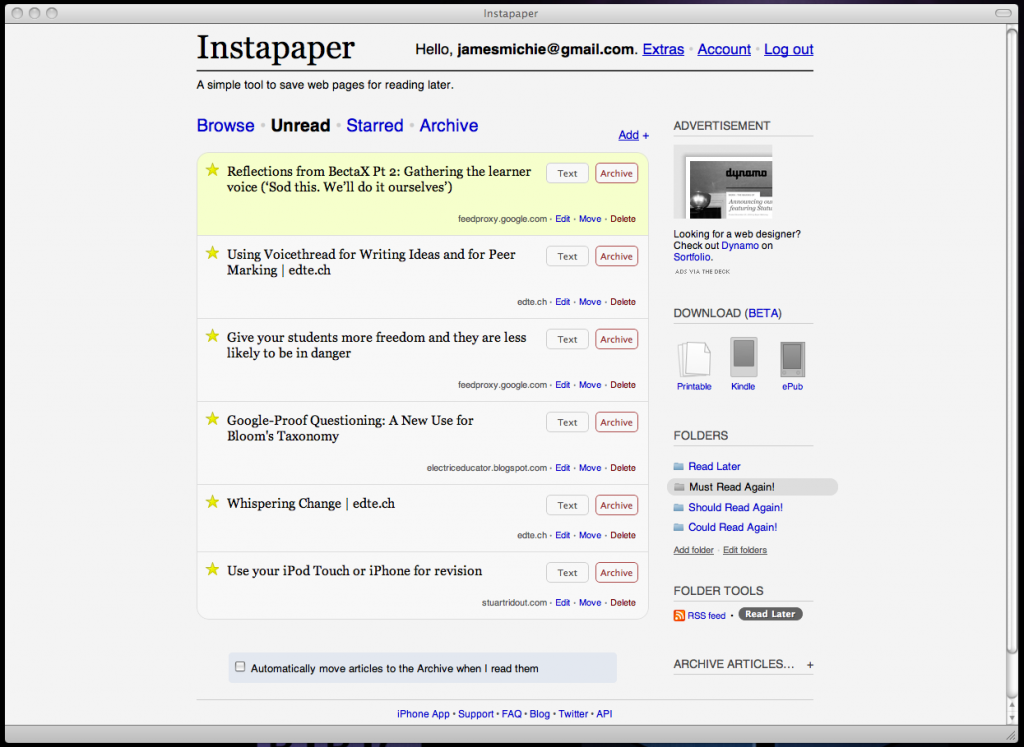
Here are the results of setting up Instapaper with Fluid:

instapaper

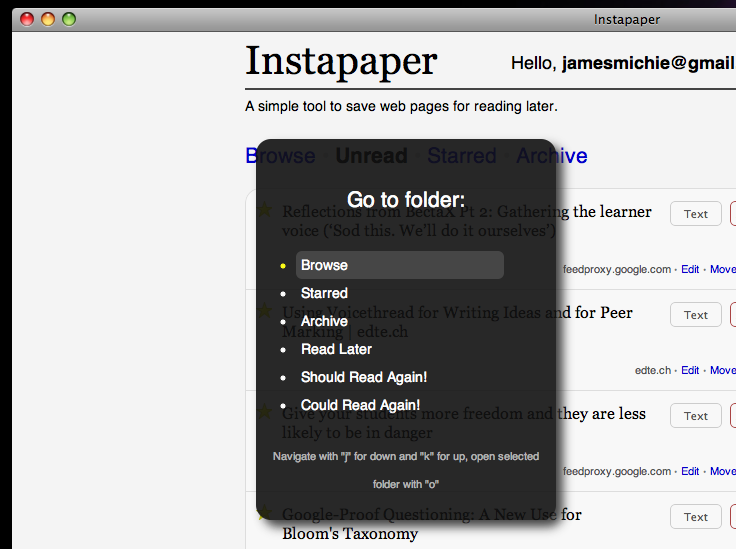
I didn’t stop with this one in simply creating the app I also installed a user script called Instapaper Beyond. It’s a script for Fluid created by Brett Terpstra which adds keyboard navigation and some special features. For example: (alt+g) brings up the “Go to folder” menu – just one of the very useful functions offered in this script.

instapaper beyond go menu

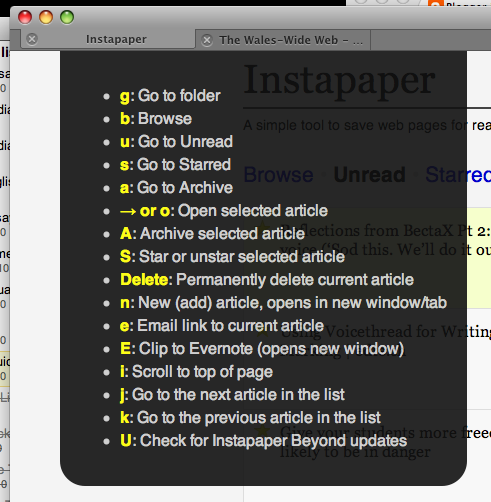
There are many more functions that make browsing Instapaper very enjoyable all of which can be controlled by the keyboard. Pressing (h) will bring up a full list of them.

instapaper keyboard navigation

And that’s it. Two apps that help improve my productivity and workflow when surfing the web. I think that I am going to create a stand alone Google Reader app as this makes up another integral part of my web workflow.

If you have any questions or want some advice about this process please e-mail me or tweet me @jamesmichie. Comments are always welcome.

Assessment For Learning With Twitter

There is a lot of discussion within the #edtech community about the value of using Twitter within the classroom, which is, in turn, followed by a second conversation about whether educators should be using Twitter in school at all.

I personally believe that Twitter has the potential to be invaluable within education as long as the right safeguarding precautions are taken.

The most obvious use for Twitter I feel is to utilise it as a tool for giving feedback as part of assessment for learning.  Therefore, I decided to start there and trial this with one of my Year 10 classes.  Why Year 10?  Mainly due to the fact that I believe they are mature enough to handle the use of Twitter sensibly and that if successful it could become part of our working process; having time to develop its use through to the end of Year 10 and beyond.

My students set up their accounts with me in the classroom.  I gave them a clear set of instructions about how to set their account up – most importantly that their account name be created in such a way that they can not be personally identified by it and that their account is locked so that they can control who is following them.  To make the “following” aspect even more straightforward I followed (with a specific Twitter account I set up for use in school) all of them and created a group “list” that they could then follow.  It meant that they were not searching through lots of other people to find each other and possibly coming into contact with people and tweets that they shouldn’t.

I wanted to be sure that they looked on this as an educational tool – although that was not too hard as some of them were quick to tell me that: “Twitter is for old people like you sir and Facebook is for us, teenagers!” – thanks a lot I thought to myself.

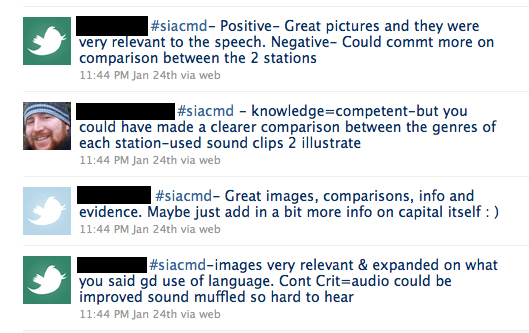
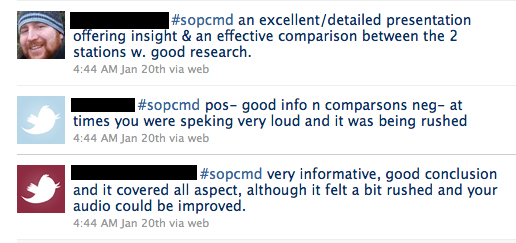
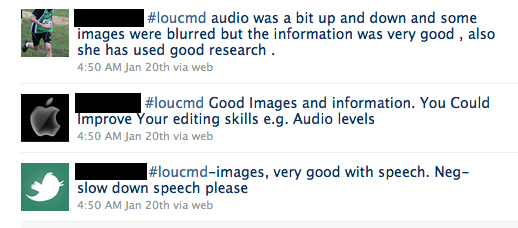
The group of students I decided to trial this with were my Creative Media Diploma students.  They are a small pilot group so provided a situation that was manageable to try out a new form of Assessment For Learning.  Here are some examples of tweets by the students:

twit feedback 1

I feel that the 140 character limit was actually one of the most effective aspects of the process – the students found it challenging at first but once they got over the fact that they were being allowed to communicate as they would in a text message or e-mail with friends they quickly adapted and began sending very short but constructive comments to each other.  The unit had culminated in the students creating a multi-media presentation (animated still images and audio) comparing BBC Radio 2 with either Capital FM or XFM.  The students were required to evaluate both the analytical content of the presentations and the visual/auditory features.

twit feedback 3

To facilitate the process each student was assigned a hash tag which was made up from the first three letters of their name and then the initials of the course “cmd”.  This allowed for easy searching and provided some uniformity and structure to the task. I asked them to make one positive comment and one comment that offered some constructive criticism.  This was handled fairly well and only one student on one occasion wrote something about another students work that the rest of the class and I felt was not appropriate.  Due to the public nature of the process the students were quicker than I in picking up on it, making the student who sent it send a tweet apologising and for them to delete the offending tweet.  You see it is about teaching the responsibility.  If we treat what we do online seriously they will take it seriously.

twit feedback 2

Each hash tag ended with cmd as an identifier of the task being evaluated.

After the evaluations were complete the students were asked in the following lesson to use Twitter Search to locate all of their tweets.  They printed out a copy of all the tweets that contained their given hash tag for their portfolio and read through them reflecting on the positive and negative points that they had been given.  They then set themselves two targets. One target explaining how they could improve the content of their presentation and one target as to how they could improve the visual/auditory features.  Here is an example of a students targets which they submitted to our Virtual Learning Environment (moodle), printed out and stapled to their tweets inside their portfolio.

example of target setting

This was an enjoyable and (I feel) highly effective process.  It certainly was for me as a teacher, being able to offer feedback and advice instantly but in an alternative way to the usual verbal approach.  The 140 character limit helped I believe as I had to get to the point rather than waffling on! There was a record of it all, just as if I had filled in some laborious assessment sheet. And they were able to respond to the feedback and they got to not just know what I thought but what their peers thought as well.

Furthermore, it was helpful to me to see what the other students were saying – giving me an insight into the way they saw each others work at the same time I was assessing and evaluating it.  This made me stop sometimes and re-evaluate what I was saying in terms of feedback.  As the process developed, being able to read each others tweets, we all got better at it – providing better and better feedback for the student being evaluated.

While Twitter remains available at school I will definitely use it again for this process and hopefully for others.  I have considered using Twitter to help develop my Y10 English class’ writing skills – a story or poem developed tweet by tweet!  I also saw, just today, as I was working on this post that @tombarrett used Twitter in his classroom today using his PLN to tweet what the weather was like in different parts of the country.  I’ll say no more as I know that he plans to blog about it himself! This to me was a fantastic use of Twitter in school and exemplifies the value of it being left open and free for use, not shut down (behind a firewall) like so many other great social learning tools seem to be.

If you would like to know more about this project or other ways I plan to use Twitter in my classroom please feel free to tweet me @jamesmichie.

New Blog! New iPod! An Update!

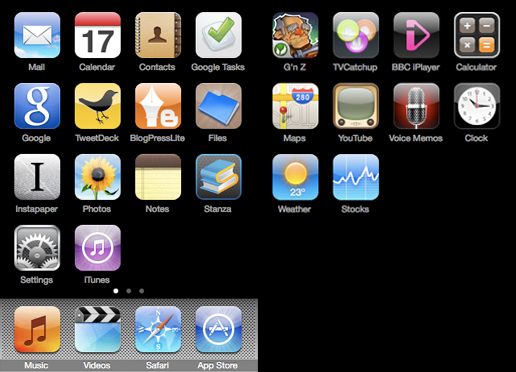
Since this whole blogging thing started with my new iPod touch I thought that it would be fitting to make my final post for week one of “James Michie…a 21st Century Educator” an update on my progress learning to use it, the apps I’ve added/deleted and my first game download.

apps 19.02.10

The image above is my current set of apps and the layout that I am currently working with, since my last post I have done the following.

  1. I realised that apart from “Tasks” there was no major benefit to me having each Google feature as a separate button – I can access them all from within the “Google Mobile App” and once I am in I usually leave them loaded up so that I can simply return to them at leisure within Safari.
  2. Instapaper is even more useful to me now that I have access to it on a mobile device.  I have been reading even more, increasing my productivity and in turn filling up more of the free space in my “brain-attic“.
  3. Having moved from WordPress to Blogger I have installed but not used the “BlogPressLite App” – it has gained mixed reviews but I will try it out sometime in the near future.
  4. I have read two whole books, downloaded with “Stanza“.
  5. I have used the Notes App twice when asked to go pick up some odds n’ ends from the shops.
  6. I have gotten somewhat annoyed by the fact that if I check my mail using the Mail App that it leaves a copy of the message in the All Mail folder after I have deleted it from the Inbox.
  7. I have watched bits of programmes on both BBC iPlayer and through “TVCatchUp“.  Although, I have not settled with myself the idea of watching a whole show on such a small screen – after all I am at home and have a 17” Macbook Pro that serves my online viewing pleasure very well.
  8. I deleted “Wikipanion” after I realised that learning the touch-screen finger swipes to move, zoom in/out, select all, copy+paste was not that hard, using Wikipedia on Safari was not that difficult after all.
  9. I am going to stick with “TweetDeck” – it is working as well for me on the iPod as it is on my desktop.
  10. Finally, I downloaded my first iPod touch game.  I have not really played a computer game since university so this was a treat.  My first computer when I was just five years old was a “ZX Spectrum 128k” (the one with the built in tape deck) – its bread and butter was platform games.  So I went for “Ghosts’n Zombies” a single player-platform game with plenty of shooting, lots of bleeps and squeeps and nice cartoon-styled graphics.  It makes good use of iPod touch’s “accelerometer” and I have enjoyed playing it – while it’s a new game to me and the input method is very different to using a joystick or joypad it was an almost nostalgic experience.

Well, that is all for this week.  I have enjoyed exploring and learning to use my new iPod.  Being back at school next week will give me the opportunity to push one or two of its features further inside the classroom and during meetings.  It is my hope that it goes someway to furthering my efforts to be paper-free!  I can’t really call myself “…a 21st Century Educator” if I’m still reliant on pen and paper, now can I?

New iPod! New Blog!

I have been thinking about creating a blog, not for my Media classes or English classes but for me; about me; my thoughts on education, media and technology.  A place where I can wax lyrical on the joys of my job, the love I have for learning and the path that I am forging – seven years into my career as a “21st century educator”.

What finally tipped me over the edge? My new iPod touch!  Having finally bought one after clinging to my iPod classic for some time now made me think that I need to set-up this blog and jump right in.  The simple fact of the matter is this, the iPod touch is like all good learning, in that to really get to grips with it you simply need to download some apps and experiment; see what works and what doesn’t.  I have decided to approach this blog in the same way! For a while, it will go one way, then another (changing themes, adding/removing apps and widgets) but eventually it will find a form, some sense of structure and hopefully a sense of self.

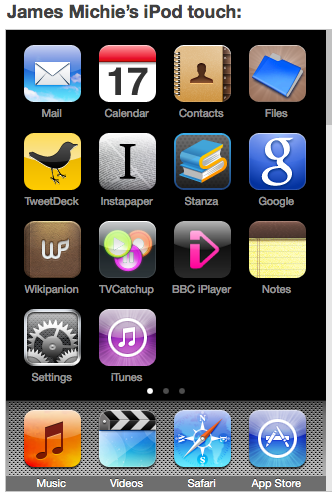
Since it was my iPod touch that caused me to be writing this post, I thought I would add some info on the progress I have made in getting to grips with it over the last 48 hours.  Below is a picture of the apps that I have already installed on to it.  Underneath the picture I have tried to offer some explanation as to the reasoning that went behind my decision to download and install each app.

Ipod touch apps

I was a good new iPod user and began by syncing my Google account with the iPod – linking my mail, calendar and contacts. My next priority was to pick a Twitter client.  This is a very important decision as Twitter is to me: the most useful and invaluable communication tool since the invention of e-mail.  I have been using Tweetdeck on my Macbook Pro for some time now, so I naturally gravitated towards their iPhone/ipod app and I am reasonably satisfied.  I did briefly (45 minutes to be exact) try Twitterrific but I really did not like the GUI at all.  Next I wanted access to the rest of my Google stuff, I say stuff because I use so many different Google features that I have lost track.  I knew that I definitely wanted to be able to access/read/update my tasks, docs, reader and photos, so I installed the Google mobile app for iPhone/iPod.  It works, like Google products usually do, beautifully.

With the most important features sorted yesterday, I spent today focussing on the other things that would make my use of the iPod touch the experience I hoped it would be.  I knew that I would want to be able to store, read and transfer files.  This is quite important for me as an educator and life-long learner. Having gotten a £15 iTunes gift card free when I purchased my iPod touch I was prepared to pay for the right app.  I went for Files in the end, the GUI is simple but clean and the process of copying files on a Mac is simple and clean also.  I went for the pro version as I did not want adverts and I also wanted plenty of storage capacity.  Next I installed the pro version of Instapaper as I use this almost as much as I use Google reader.  I read a lot! And I don’t always have time to read an entire article right at the moment when I find it.  Furthermore, I spend a lot of time in front of the screen so I wanted to be able to take stuff away and read it at my leisure – able to take breaks when I want to help with my eyesight/headaches and I also wanted to be able to read offline. Instapaper for the iPhone/iPod touch does of all of this with ease.  Installing this app also led me to learn more about the functionality of the iPod touch; learning to install “bookmarklets” into Safari in order for me to be able to copy web pages to Instapaper from with the iPod touch’s web browser.  I used the same process to add a bookmarklet that allows me to save web pages to my delicious bookmarks as well.

After I had added and set-up those apps I set about looking for and adding some apps that are simply for my pleasure.  I added BBC iPlayer as I was extremely impressed by the pixel quality of the video, streaming it on the iPod touch.  Then thanks to Doug Belshaw (more about Doug further down in this post) and his post here (very timely indeed!), I added TVcatchup which allows you to stream live British TV including BBC 1, Channel 4, E4 and Channel 5 amongst others – the quality is again awesome over a wifi connection.  Finally I two apps that reflect my thirstfor knowledge. I  added Stanza so that I could download and read books.  I found it after looking for apps to read pdfs on.  And I added Wikipanion so that I could search Wikipedia in a more user friendly way than through Safari which on the iPod is not bad but does have its limitations. Come on Google, I want Google chrome for the iPod touch and I want it now!

There, I hope that was neither too painful or too boring.  It was a little self-efacing but hey this blog is about me so I’m not going to appoogise too much. Before signing off I need to say thanks to Doug Belshaw for some sage like advice.  As I am want to do nowadays, I consult before I do and I have admired Doug’s blog for some time now – he answered my questions with interest and honesty. For this I am grateful.  He is always the provider of excellent ideas and useful information, his blog is well worth following!  You can also buy or download for free a really useful book that he, I and many other members of our Twitter network collaborated on called “#movemeon”.  The original blog post suggesting the idea is here!

Well that is all then, I’m off.  I may not blog every day but when I do I intend it to be with purpose and hope that others find it interesting and useful.

Goodnight!