MA in Education

I recently began an MA in Education. The MA is delivered by the Westminster Institute of Education; part of Oxford Brookes University. A modular course; it begins with the Postgraduate Certificate in Advanced Educational Practice (CAEP). Made of three modules; accounting for a third of the full MA, the course is delivered part-time with sessions held at my School.

The first module is a School-based Enquiry in which I have chosen to focus on my use of Google docs. As an enthusiast in the use of technology in the classroom; Google docs was one such technology that I believe had a significant impact on my student’s progress last year. It is my intention to try to quantify that by completing research into its impact on an individual class’ progress this academic year.

Building on the work that I did last year and recent improvements made to Google docs I am going to limit my research to one specific use of Google docs: How does it improve the quality of one-to-one assessment for my students? At the moment I am in the latter stages of planning this research. You can view my progress here.

The other modules that I will be undertaking this year are Assessment for Learning and Developing E-Learning.

Ii is my intention to document my progress throughout each module on my blog. To do so, I have created a dedicated page here. I hope, that by documenting it publicly, it will help me keep to a strict schedule while also providing opportunities for wider input and feedback on my research.

To maintain my organisation and productivity I have installed Evernote on my MBP, Android phone and in Google chrome to store and record notes. I have also linked my Oxford Brookes Library account with Google scholar to ease the logging of journal articles and essays. I will be mainly downloading these to read on my Sony eReader allowing me to attach notes. Finally, I will be tagging posts and tweets related to my research with #mainedu.

QR Codes in Education: A Burgeoning Narrative

Since I last published thoughts on how QR Codes could be used for learning in a short audioBoo (click the link or scan the QR Code on the right), there has continued to be a growing and significant buzz about QR Codes on Twitter and in the blogosphere. A narrative is developing as ideas, experiences and best practices are shared and discussed.

The ball got rolling at TeachMeetX where Julian S. Wood delivered a thoroughly engaging presentation on storytelling and QR Codes. I couldn’t be there in person but was fortunate to catch most of what Julian had to say via UStream. What struck me during the presentation was not the quality of the tech but the pedagogical principles that underpinned the activities putting the technology where it belongs: at the heart of making the learning happen but not directing it. Hopefully, the video of the presentation will be available soon and everyone can see it. One of the tools that Julian used was Delivr which I have written about here and will mention again later in this post.

A couple of days later I was catching up with Twitter and dropped in on a discussion that was taking place about QR-Codes. Dughall McCormick tweeted out a link to a blog post he had written about QR Codes and an app called stickybits – see Tim Ryland’s article here for more info on that. Dughall shared a variety of ways that QR Codes/stickybits could be used, all with their various merits and implications. My personal favourite was this:

Stick a code on the front of a pupil’s exercise book. Feedback can be added in any format as time goes on. This can be done by peers, the student, teachers, parents etc. The same could be done for homework presumably

This struck me as immediately pertinent as there is a huge drive on assessment for learning and the marking of work in my school at the moment, what with Ofsted just around the corner. More importantly it is one of my many beliefs, in relation to education, that assessment can be a driving force in improving a students progress and attainment. This may be one way that I myself experiment with QR Codes and/or stickybits.

Dughall finished by sharing a few other useful links including a collaborative guide produced by Tom Barrett et al. about using QR Codes in the classroom. It is part of his excellent Interesting Ways series and so far there are 14 different ideas about how to use QR Codes.

Also mentioned by Dughall and tweeted out the same day was a post by the ever innovative David Mitchell – blogging about his use of QR Codes with his Year 6 class.

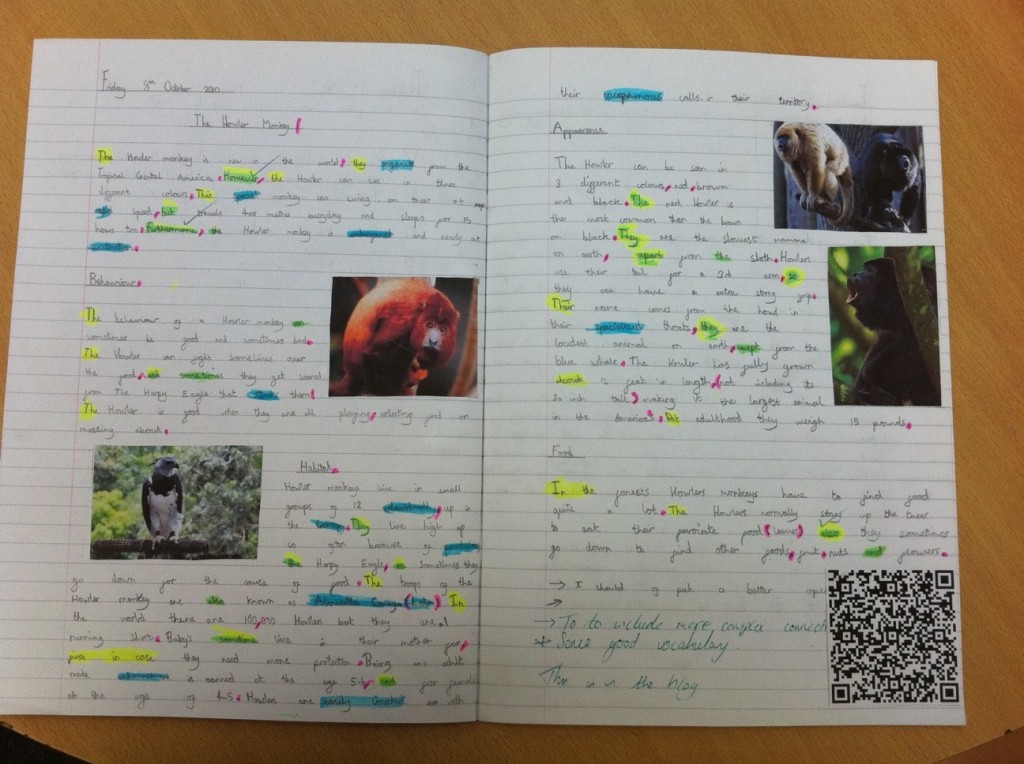
He explained and demonstrated through photos how they had been used. Essentially his students had drafted a piece of work in their books. They then wrote up their work on their class blog and generated a QR Code from their blog post’s URL. This was then stuck into their books. Instantly the gap between analog and digital work was bridged (or as David put it: “A Literacy book suddenly becomes an interactive book of weaved magic!”).

By allowing anyone to scan the code and see the final draft of the work while looking at the first draft it changes the engagement and interaction with the students work bringing the student, teacher, parent closer to creative and developmental process. A clever and highly effective use of QR Codes I think.

Below is an example of one of the images from David’s post – click to zoom and then scan the code – it really works!
As the discussion continued on Twitter over the next couple of days more and more resources and posts related to QR Codes began to come to light, demonstrating the fact that the technology is not that new and that educators have been toying with it for a while now.

One such post that was tweeted was from Ollie Bray who had written about QR Codes (back in 2008) in a post titled: iPhone in Education – Using QR Codes in the Classroom.

In his post he details how QR Codes work with some clear broken down screen shots. Towards the end of the post Ollie makes a couple of suggestions about potential uses but overall it stands as a good post for QR Code novices to help them understand the basic principles.

This was followed by a link to a PDF document (hosted by the EDUCASE Learning Initiative) titled: 7 Things You Should Know About QR Codes (written in 2009). The document is well structured and concise (2 pages), offering answers to basic questions like: “What is it?”, “How does it work?”; to more complex ones like: “What are the implications for teaching and learning?” This is a good starting point for QR Code novices. Download here.

There were a few more posts that were dragged up from the archives but I will not comment on them all here. A Twitter search for QR Codes should provide some useful results.

The final post I wish to discuss is fresh and new and was only published this week, on October 26th, over at the blog of David Hopkins – Don’t Waste Your Time. Titled: QR Codes: It’s not all about the phone, you know. David offers up three potential applications that could be used to scan QR Codes from your desktop computer. This was interesting and I am going to download and play with the Desktop QR Code Reader myself.

Reading David’s most recent post though led me back to his many other posts about QR Codes, some of which I had read through a few weeks ago when I had just begun to look at QR Codes myself. I felt that I would re-mention the post: QR Codes in the Classroom. The explanation and suggested uses are very good but even better than the written word is the video David has included of QR Codes in action. Scroll through the post, find the video and give it a watch. If you are still unsure about the potential of QR Codes, you won’t be after you have watched the video.

With a growing list of potential uses and some very well thought out pedagogical approaches I believe it’s fair to say that this technology is worth investing the time in. To get started with my own use of QR Codes I am going to focus on two areas:

1. Creating a class project based around similar principles to those presented by David Mitchell. I really felt the simplicity of linking physical writing with online content was an interesting notion that warrants further exploration.

I need to give it more consideration but I see excellent opportunities here to connect the creative/tactile freedom of my classroom with some of the tools that I already use with my classes online. One idea that came to mind was to get my students to collate a variety of useful material on a Lino It canvas, generate a QR Code for their wall. Then back in the classroom preparing for their controlled assessment they could scan the QR Code (now stuck in their books) to access that information.

Once I have planned the activity better and have the results I will certainly blog and share it.

2. Educating students, parents and fellow teachers on what QR Codes are and how they can be of use inside and outside of the classroom. I think there is an opportunity to share simple info like revision tips, short helpful videos and other similar materials. In principal this is straight forward as I have seen several good examples of QR Codes being used. One of the keys is to include info on how to scan the codes and where to get an app to do it.

With this in mind I found this clip from CSI on YouTube. It provides a fairly clear and engaging explanation of what a QR Code is.

I have shared it via Delivr which displays it on a dedicated page making it easy for it to be reshared. What’s more, as I mentioned in my blog post about Delivr when viewed on a mobile phone the page is optimised for mobile screens.

The success of sharing info in this way will be more difficult to judge than within the controls of a classroom based activity. This is why I will be using Delivr to generate the codes. Signing up for an account allows you to track the QR Codes you create. I will be able to get instant raw data on whether the codes are being scanned.

Again I will blog and share the results.

Before I close this post I will share one more useful link. There are several pages on the web that help you find the right QR Code reader for your phone but I felt that this one from PercentMobile was the most effective. Simply select the manufacturer and handset model that you own and it then provides you with a link to an app that will work with your device. Get out there and get scanning.

If you have anything to add to the QR Code narrative, perhaps you have experimented with them in your classroom; or you have a useful resource to share; or you have read a good blog post then please share it via Twitter using the hash tag #qrcode or reply to this post.

QR-Codes In Education – Why?

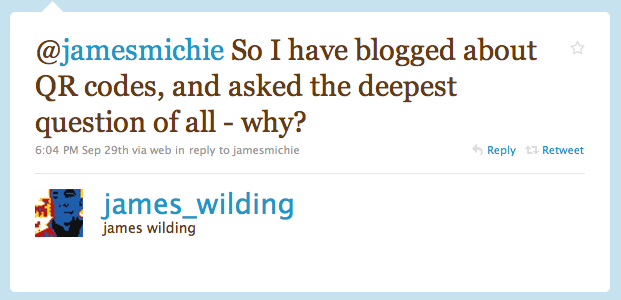
After tweeting a few times recently about QR-Codes I recieved the tweet below from James Wilding.

James Wilding Tweet

Click play on the AudioBoo player below to hear my response.

Links:

Subscribe to my Boos:

iTunesRSS

Google Docs In The Classroom – Part 3: Assessment

This is the third in a series of four posts about my experiences of using Google docs in the classroom. You can read part 1 here and part 2 here.

Part 3: Assessment (or 1-2-1 Teaching and Learning)

I will begin this part of the series by offering a little contextual detail which will help you (the reader) make better sense of this. Year 10 students (High School Freshmen to my American peers) in my school sit exams in March – intended to be their first real experience of externally set GCSE exams. Having begun this past year introducing the new OCR GCSE Media Studies syllabus, I decided that we would have the students sit their exam module in June of Year 10 rather than at the end of Year 11. Reasons? The exam is worth only 40% of their total mark, the exam units give the students a well rounded understanding of all the key media concepts, we will have more time to develop practical skills before completing controlled assessment of those skills in Year 11. Having committed to this set up the students studied the two units and sat a mock paper in March. The results were reasonably good but there was plenty of room for improvement across all of the grades. It was here that I had an “a-ha” moment. I could use the multiple editors / real time editing functionality of Google docs to good use. What if I had the students work through each of the exam questions in Google docs, I mark it, identify errors, set targets; they go back in and re-edit; I re-mark their work and so on; allowing them to develop their exam skills?

This concept is not new! The methodolgy is grounded well within assessment for learning practices and can be achieved in the classroom without the tech. What I was hoping was that the features of Google docs would improve the process, augmenting it, so that it would be sped up, increasing the productivity of both myself and my students. My belief that this could be the case was based on my previous use of Google docs to collaborate in planning – this had successfuly improved that proces ergo it could do the same for assessment for learning.

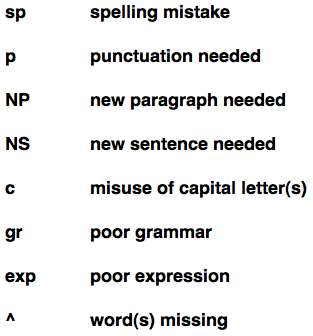
I set about planning an introduction to what we were going to do. I brought along a copy of the English department’s marking code as one of the issues for a number of my students was not their knowledge but the way that they expressed themselves was stopping many of them from achieving the higher marks.

marking code

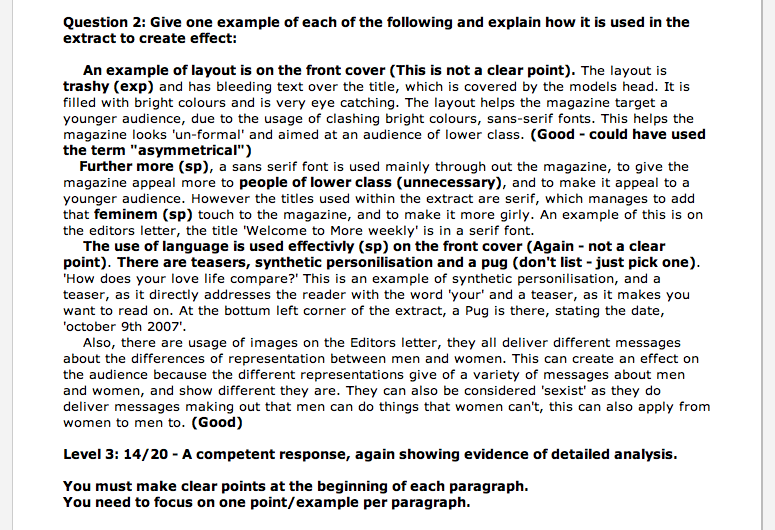
I copied up one of their responses and marked it in Google docs to demonstrate what a piece of marked work would look like. There were several possible approaches to this. For example there is a built in comment feature. However, I selected my own method – a mixture of my traditional marking techniques and the technology of an electronic document. I like to comment directly around or next to the error so this I retained by inserting my comments within parenthesis. I utilised the bold font feature to make it clear to the student where the offending punctuation, word or sentence was. I felt it was important to model this so they knew what to expect. At the bottom of each response I would follow another well practised feature of assessment for learning by including a positive comment followed by two specific targets to improve. What I did do however, was also give a specific mark each time, allowing the student to see numerically how they were doing. Were they improving, staying the same or getting worse? Here you can see an example of a marked first draft:

example of marking

Working in this way, with the students sharing their work directly with me, had a massive impact on my approach to both using Google docs in the classroom as well as the way I approached assessment for learning. When I started the students on improving their essay writing skills I decided to allow them sometime to work on these skills in class. I targeted specific students based on my knowledge of their weaknesses and potential and began to assess their work in real time with them. This 1-2-1 real time editing allowed me to target and support different groups of students across a series of lessons. I saw an immediate impact on their learning. Due to the immediacy of the intervention it really helped the less able students get up to speed and the more able were pushed beyond the standard they had been producing. Red pen was removed from the process and many said that they felt better having their work assessed as they wrote it because they “hated it when they had worked so hard on some work only to get it back littered with corrections”. In real time they could see where they were going wrong and correct it there and then. This meant that I could move them forward in their skills at a far more rapid pace.

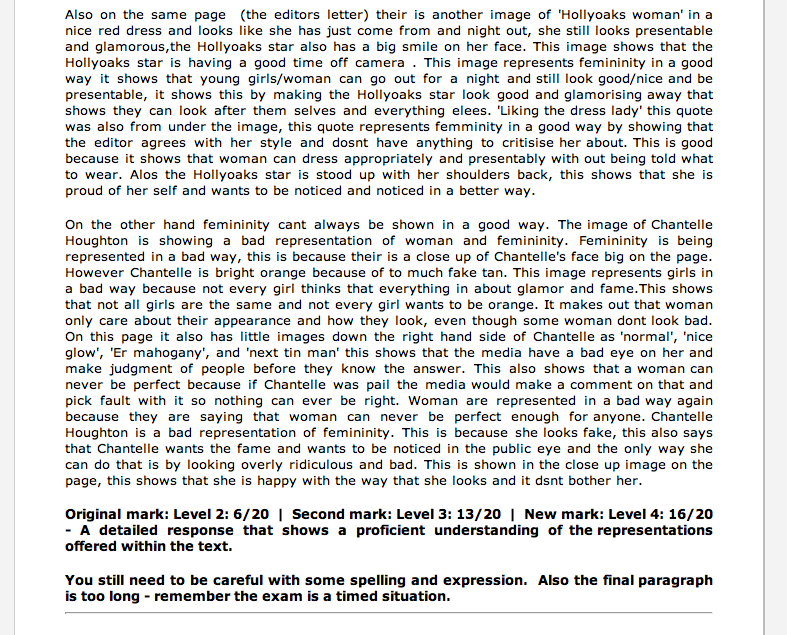
I continued this process over five weeks. Every homework (2 per week) involved responding to practice essay questions (draft / re-draft), while in class we worked on analytical skills and explored the finer points of representation, institutions and audiences. This new approach created a culture of expectation. I’ll be honset and say that it put quite a demand on me to keep up with my marking. With work being submitted / updated in a far more fluid manner  it created a situtation where for once I was forced to follow my own good advice: marking little and often rather than allowing the marking to amass. Here is an example of a students work that has been through several drafts, each time given a mark and targets for improvement.

example of improved response

The results of this approach brought assessment for learning into the heart of my classroom and had a significant impact on many of my students. I have found that students are usually mostly interested in assessment of their learning caring more about the mark or grade. As I chose to combine both the assessment of their learning with target setting throughout the process many of the students became more focussed on how to improve their work than on the actual mark itself. Some became so deidicated that they would re-submit their work less than twenty-four hours after I had marked it. And some would email me if I had not marked their work in a few days eager to see how they had done and how they could improve further. Here are some examples from one student showing her development through the five weeks:

Example 1: After 2 weeks: One response has been drafted twice. Here, you can see the original mark and improved mark including targets for further improvement. There are also two other questions that have been responded to and I have marked them offering guidance on how to improve.

Example 2: After 5 weeks: Here is the same student responding to a new set of questions the week before the exam was due to take place. Her responses are excellent demonstrating a high level of progress.

While demanding, using Google docs in this way completely put the focus on the students’ writing and exam skills. The most gratifying outcome of this was the progress that they made. They felt confident walking in to the exam because of the number of practice questions they had completed and that the feedback on how to improve had been so regular. I feel that the technology actually transformed an approach that is very much achievable in the classroom. The amount of writing that the students had to do was significantly decreased. Once a response was drafted they never had to re-write the whole thing – which they would have had to do if they had written their reponse to the questions by hand on paper. This, I believe, was a significant motivating factor for many of the students; ensuring that not only the hardest working students made progress but those students who would have found the amount of writing involved (re-drafting by hand) too much to handle also made progress.

A further benefit was that assessment came to inform the content of both my lessons and revision sessions in the run up to their exam. Marking little and often, having the students redraft and develop their skills allowed me to see patterns and areas of weakness within the class quickly; allowing me to adapt what I was planning and focussing on. The impact on me was therefore as beneficial as it was for the students. I certainly plan to use Google docs in this way again next year. It is very rewarding to be able to connect 1-2-1 with m students at this level, guiding them and supporting them in their journey to become more articulate writers. It is an approach that needs forethought and planning but is ultimately, I believe, the best approach to ensuring individual students make progress.

If you would like to use Google docs to support assessment for learning here are my recommendations on how to get started.

How to:

  1. Have students use a common name for their document. Don’t worry about the name being the same as Google docs identifies for you who the author is.
  2. Have them rename the document immediately after they have created it.
  3. Next, have them share the document with you. It is useful to have a folder set up in advance. Once each student has shared their work with you put it in the folder.
  4. Use a couple of classroom sessions to support selected students in real time – create an ethos of writing, editing an re-writing.
  5. Set deadlines for drafts to be submitted but encourage students to submit early – allows you to mark little and often.
  6. Decide upon a marking and assessment system – explain it to your students and model it on the board.
  7. Set clear targets at the end of the response and allow time for your students to resubmit.
  8. Have them edit the same document to limit confusion and aid their organisation.

Next time: What’s Next?

Animating With Post-It Notes & Flip Cameras

Today, I set about teaching the principles of animation to my Year 11 Creative Media Diploma class. After watching an inspirational (and slightly intimidating) example of Flip Book animation, I gave a short tutorial on how to make a simple animation using only a small pack of Post-It notes, a pencil (and/or fine liner) and a Flip camera. My students were suitably inspired by the video and were literally jumping out of their seats as I explained the principles of how animation works; also passing on a few key do’s and don’ts.

All they really wanted was for me to shut up and let them get on with it, and that they did. What followed was 40 minutes of pure concentration. You could hear a pin drop as everyone of them drew a frame, tested it, drew another frame, tested it again. They all realised pretty quickly that animating is a slow, time consuming but ultimately rewarding process. And everyone of them walked away understanding how animation works, having successfully created their own Flip Book.

I wanted to give them the chance to see each others Flip Books in action and to get them back in the habit of peer and self evaluation. To achieve this, they used the Flip cameras to record their Flip Book animations and then uploaded the video to the VLE. Watching each others work was great and all of the students began leaving positive comments and ideas for improvement under each of the videos. They have now gone away to reflect on the feedback they received and set themselves a target to take into their next piece of animation.

The Flip cameras proved to be invaluable, once again. Due to their ease of use and built in USB, they made filming and uploading the videos an absolute breeze, meaning that more time could be spent on the learning rather than dealing with technical issues that so often seem to arise with when technology enters the picture.

Here is one of the Flip Books made in today’s lesson: