Connecting With Parents Online (Part Two)

After the success of our previous online meetings with parents, I decided that the format would be a good way to help the parents of Year 10 GCSE Media Studies students understand what their exam entails and how they should be revising for it.

The Year 10 cohort are the first group studying the new OCR GCSE Media Studies syllabus and it was decided that we would enter the students for the exam in Year 10. This will allow them to focus on coursework (controlled assessment) in Year 11. The coursework element is now worth 60%.

While I can’t show the recording of the presentation due to privacy concerns, below is the PowerPoint that I used. I tried to adopt the Lessig method of presentation, although at times I didn’t manage to be as succinct as I would have liked.

[iframe src=”https://docs.google.com/present/embed?id=ddtck3wr_179ddzzwqjp” frameborder=”0″ width=”410″ height=”342″]

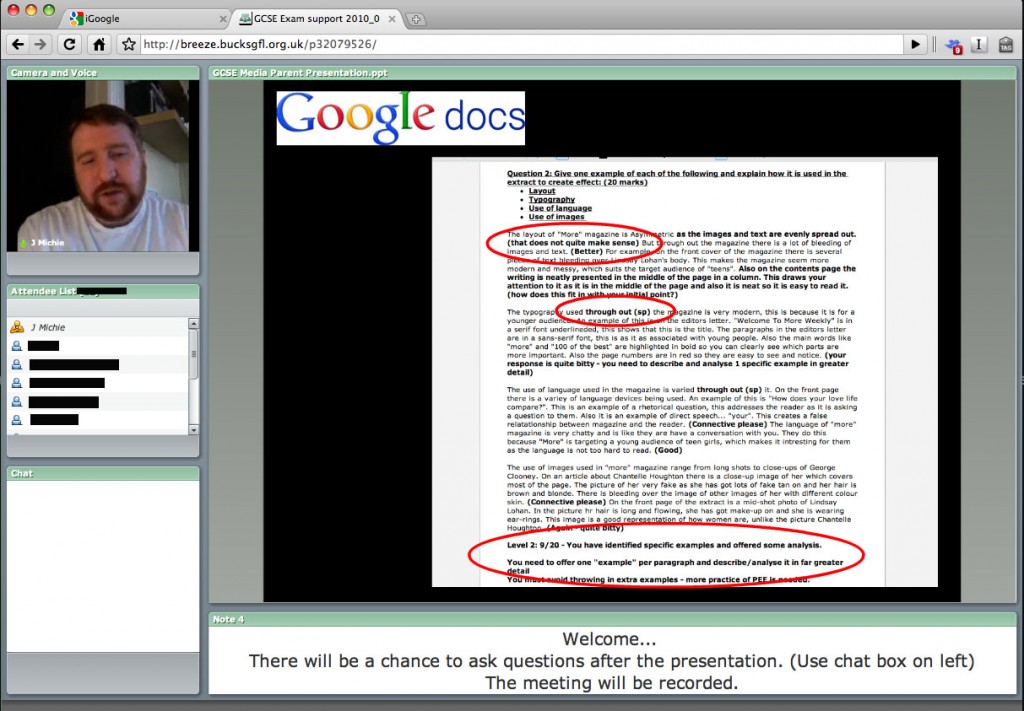
And here is a screen grab of the meeting room. I stick to a standard layout allowing the PowerPoint to be the dominant feature on screen. There is a chat box in the bottom left which was used by the parents to ask questions after I had finished speaking. Above that is a pod which tells me who is participating in the meeting (I have blacked out the names) and in the top left is the Video feed.

connect room

Feedback was once again resoundingly positive, with all of the parents who attended the meeting praising us for our innovative approach to keeping them informed. What’s more they echoed the sentiments put across during the previous run of online meetings that it was lovely to be able to receive the information in the comfort of their own homes.

I believe that this form of parent/teacher interaction is highly sustainable and can only see that we will continue to develop its use during the next school year.

The access to and ease of use offered by Adobe Connect (via BucksGfL) has been integral to its success as there is no sign up required by the parents. They only need the link which we send out by email and/or postcards. A link is also placed on the front of the school website.

online meeting web banner

Like truly effective ICT use, we wish to ensure that this is as easy for parents as possible – we don’t want them to be turned away at the door!

Should you like to know more about the online meetings or our use of Adobe Connect please contact me by email or via Twitter.

Flip Cameras & Post-it Notes

flip ultra hd and post it notes

A fellow Media Studies teacher contacted me about a week ago to ask permission to use one of my student’s coursework pieces on his blog. I agreed and being curious had a scour of his blog to see how a fellow blogger was making use of his own class blog. While scrolling through the posts I came across an activity he had completed with his A2 students. To help them prepare for their upcoming exam, he got them to make videos using Post-it Notes explaining the skills they had developed in post production during their coursework. I immediately saw an opportunity to use the same tools to help my Y10 GCSE Media Studies students to prepare for their exam which is coming up on the 25th June.

First of all I had to assemble the tools. As this was a quick project, I decided, it would be a perfect opportunity to use the Flip HD Ultra Cameras that I had bought earlier in the year for activities such as this. I made sure that every group also got a tripod, fine liner, pack of highlighters and of course Post-it Notes.

When the class entered the room I had one of the A-Level student’s videos playing. After my students had settled I stopped the video and explained that we would be doing something similar today to help them with their exam preparation. Most of them had clocked the collection of camera and tripods as they had walked in so there was a sense of anticipation in the air.

I explained what the task was and what the expected learning outcomes should be. I then demonstrated how to use the equipment and made 10 seconds of video myself in a slightly Dylanesque way holding up and throwing away Post-it Notes one by one as I narrated direct into the camera. The students got a laugh out of seeing me on camera while also seeing how easy the equipment was to use. Next, I reminded them of a few key points and what their deadlines were. After that, I put them into groups and let them loose. I spent the rest of the lesson supporting them answering any questions they had and dealing with any technical difficulties. (Note – You will need more space than your classroom allows, I had planned ahead and new that one or two other rooms nearby would be free for the second half of the double lesson.)

Task: Explain what you need to know to be able to succeed in your GCSE Textual Analysis paper (Section A) on June 25th.

The lesson was a double and it broke down (neatly) as follows:

L1 – After the introduction and demonstration the students spent the majority of this lesson creating the Post-it Notes and scripts to be used in their videos. There are 3 questions in that part of the paper: Q1 focuses on Genre; Q2 focuses on Textual Analysis; and Q3 focuses on Representation.

L2 – During the second half of the double the students created their videos; uploaded them, making any necessary edits; and then exported a copy to be uploaded to VLE.

They had a great time and all of the students were proud of what they had achieved. More importantly the results were great with some students demonstrating an excellent understanding of what they need to do in their exam. Some of the videos are a little out of focus and one group learned an important lesson about shot distance but all in all I (like them) was very satisfied with the activity and its outcomes.

Here are two examples of the results:

And as ever, should you have any questions you can email me or tweet me!

“Fin ur txt msgs 4 hmwk; due 14.05.”

iPhone OK

I have spent the last five weeks with my Year 11 top set English class immersed in revision. They planned their revision timetable themselves deciding what they thought their weaknesses were and which parts of the syllabus they were not as confident about. Since then we have steadily worked on each area and this past week’s focus was Cluster 1 from the Poetry from Different Cultures section of the AQA Anthology.

In an attempt to challenge the class and mix things up a bit I decided to get them to do an activity where by they compared two poems over four paragraphs – explaining the ways in which they are connected. However the catch would be that they could only use 160 characters per paragraph; the same length as a text message! When asked: “…if that included spaces?” The answer of course was: “Yes.” The students then set to work with the usual aplomb that I have become accustomed to.

I felt that using the restrictive rules of text message lengths would focus, challenge and improve my students’ ability to revise effectively. They had to think very carefully about what they wanted to say which was then reinforcing their learning. Also, it meant that they were “reducing” – a concept that I spend a lot of time drilling into my students during this time of the year. It is my beleif that effective revision works best if you can reduce the amount you need to read over time – turning a whole folder of notes into A3  posters; then into A4 sheets; then words and phrases on flash cards. Eventually, just individual words and symbols become enough for a student to remember quotes and complex ideas.

The activity also challenged them to communicate concisely – something top set English students don’t seem to be able to do very well. It was great fun and the students really enjoyed but they found it very difficult. Some even suggesting that I had taught them too well and that they did not know enough text language as they hardly ever use it. This I found hard to beieve but more and more came forward saying that they write their messages as fully as possible – some even said that when friends used text language or spelt things wrong they get really aggravated.  So, perhaps there is hope? Civilisation will not come to an end yet!

I, on the other hand, had made a classic school boy error! I had presumed too much…thinking that my students being 15/16 years old would all be expert texters.  I see them everyday with their mobile phones literally glued to their hands and ears. I assumed they held within their brilliant young minds an encyclopaedic knowledge of text language and therefore this activity would be a breeze for them. What occurred in the classroom was quite the contrary. They were flummoxed, some so used to being able to do the work that they looked completely dismayed. Conclusion: Not all teenagers like to text!

We did not give up though! Eventually the students and I started to see results, that was, after I demonstrated my own skill at using text language or should I say “txt lang”. What I was really showing them was “tweet language” as I don’t really use my mobile phone but I tweet – a lot! Having become quite effective at truncating my sentences to fit the 140 character limit it became apparent that I was the expert and demonstrated a variety of ways to reduce the length of words.

The students began to get the hang of it and some of the results were very effective and students started texting each other their messages about their poems. This is what I had hoped for! They were sharing ideas and knowledge with each other that was concise, useful and they could take it away with them. Perhaps when they are looking through their texts they will look at them and revise when they were least expecting to? Several of the students did not manage to complete all 4 text messages so they asked to finish them for homework to which I said of course they could and wrote the following on the board:

“Fin ur txt msgs 4 hmwk; due 14.05.”

As well as revising poetry and having fun doing it my class also learned an important lesson about context. As they tried to abbreviate, reduce and find the best ways of communicating their ideas in the text message format they realised that should their texts be read out of the context of the room in which they were sitting they would probably not make much sense at all. For example within the context of our classroom the students would probably figure out that:

“L+NC r sim. bcuz both exp. imp. of whit cult on blk cult”

…was a shortened version of:

“Limbo and Nothings Changed are similar because they both explore the impact of white culture on black culture”

It would be very unlikely that someone reading the text outside of our classroom would understand it. This was not the intended learning outcome of the lesson but a useful by product none the less!

If I had been in a computer room I think I would have done this with Twitter as I would have had a record of all of the messages which could have then been reused. Although, adding a hash tag would have made the activity even more challenging! This activity was a great success, my class told their friends about it and I was soon asked by some of my colleagues about it.

Mobile phones and Twitter have a place in my classroom (along with many websites, apps and other technological devices). Their place is to enhance the learning of my students. Embracing a 21st century education through the use of technology is not always easy but I would encourage you to go for it. The results may not always be spectacular but they will be useful and like anything new, need to be tested, refined and improved upon.  I will certainly do this activity again but I have already thought of several ways to make it better… As usual, should you have any questions please mail me or tweet me!

Image courtesy of mastrobiggo on Flickr.
#mootuk10 (Holes In Walls & Cyberspace)

I just found out that I have been quoted in an article on Moodle Monthly written by Kristian Still (@Kristianstill) and Craig Sumner (@hamblecollege). The article offers a recap of the first day of this years Moodle Moot UK. You can read the article here.

I am quoted, responding to the back channel discussion (via Twitter) that was flowing, in response to Professor Sugata Mitra’s keynote on “Hole In The Wall”. A stunning and humbling project which began in 1999 when he was working in Delhi. Working next to a slum he knocked through a wall and stuck a computer in with an Internet connection. After just a month many kids had taught themselves to use the computer improving their literacy and numeracy skills. This turned into a huge project that has seen massive success.

His talk, while I am yet to see it, was clearly very inspirational as it prompted masses of praise on Twitter and sparked a very interesting discussion about the nature of learning, literacy and the benefits/drawbacks of different learning environments.

Learning environments is a topic within eduction that I have been researching and discussing quite a lot recently after reading “Campfires in Cyberspace” by David D. Thornburg, Ph.D. I was therefore naturally intrigued by the discussion arising on Twitter and got involved.

I am currently working on a visualisation of the ideas presented in “Campfires in Cyberspace” and will be blogging about this in the near future. To help myself in this process I used MindNode to create a mind map (click to view/download the mind map) of the concepts presented in the paper, collecting my thoughts and ideas as I read.

Both Prof. Mitra and Prof. Thornburg, Ph. D. through their research raise some very interesting ideas about the way learning takes place and the environments in which that learning happens. My own thoughts at the moment are centered (as the quote in the article suggests) around the idea that the traditional notion of the classroom as “learning environment” is outdated and that “learning” is not constrained to any one environment but is facilitated by multiple / interchangeable environments – many of which are free of walls; be it outside (like the “Hole In The Wall” project) or virtually (in “Cyberspace”).

Here is the quote as featured in the Moodle Monthly article:

I will stop there as I am using up content that will be included in a future post.

Moodle Moot UK (#mootuk10) seemed enthralling and I really wish I could have been there today. I was happy to follow the conversation online however and as usual the wonderful people on Twitter provided me with much food for thought today. You can catch up with and follow the tweets from Moodle Moot UK via Twitter Search here or view the archive on Twapper Keeper here. Why not go one step further and join in with the discussion – the hash tag for the event is #mootuk10.

Find out more about Professor Mitra and the “Hole In The Wall” project at the following links:

Find out more about Moodle and Moodle Moot UK here:

Find out more about Professor Thornburg, Ph. D. here:

Thanks to Kristian and Craig for including me in their article.

If you would like to know more about anything mentioned in this post please e-mail me or contact me on twitter @jamesmichie. Comments are always welcome.

Creating Desktop Apps With Fluid

fluid

My best and most recent tech find for Mac is Fluid. Fluid is an application that allows you to create standalone desktop versions of your favourite web apps such as Gmail or Twitter. Neither of these appealed to me as I have Gmail synced with Mail on my Mac, and on my iPod Touch (I also sync Google Contacts, Google Calendar and my school Outlook account) and I use TweetDeck to keep up with my PLN.

However, there were some web based apps that I felt would be great to have on my desktop due to the fact that it would be good to be able to view them within a separate interface. What’s more after doing a little more research I found that if I used Fluid to create apps I would be able to make use of user scripts to tweak them – that sounded great, so I decided to begin with Google Tasks as I am always looking for ways to improve my organisation and productivity.

Google Tasks

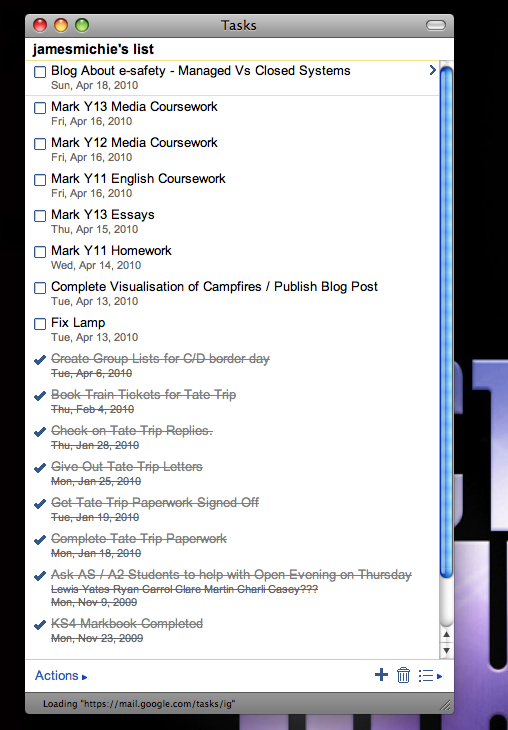
And here it is. It looks clean, signs in automatically and everything works: Adding tasks, adding info, marking when complete, syncing with Google Calendar and therefore Ipod touch.

tasks

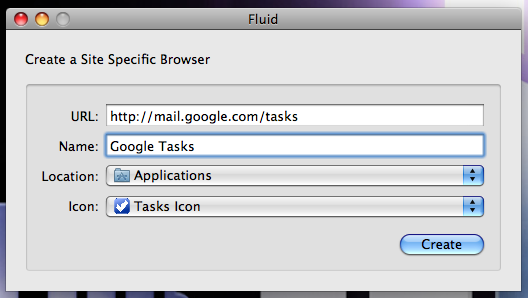
If you would like to do this you need to download Fluid. Once installed, open Fluid. You will see a dialog box (see below) into which you need to type or copy/paste the following URL: http://mail.google.com/tasks. Name the app Google Tasks. Keep the location as Applications. Download an icon to use, I chose one created by Max Headwound on Flickr (image below), found on the Flickr: Fluid Icons Pool. Then click “Create”.  You will see a new dialog box asking you to launch the app. Voilà, you are done!  You can then drag the app from the Applications folder to the dock.

fluid new app creation

tasks icon

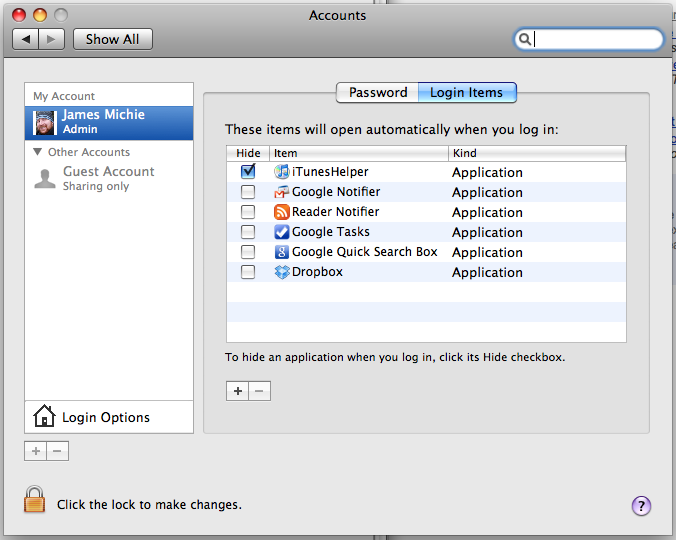
For ease of use I also added my newly created Google Tasks app to my login items so that it would load automatically when I boot up my Mac. To do this go to System Preferences / Accounts / Login items / Click the + symbol and select the Google Tasks app from the Applications folder.

login items

There are also some nice icons available at IconsPedia, choose the icon that suits you! As a Mac user image is important to me so selecting the right icon was as important as choosing which web apps I would turn into desktop apps. My next web based app that I use every day was Instapaper.

Instapaper

The process is the same as before using the following url: http://www.instapaper.com/u. If you have not used Instapaper before, I highly recommend it. It makes up an integral part of my web workflow, something I plan to write more about in a future post.

Instapaper allows you to store web pages and articles that you find to read later. It makes use of a bookmarklet to do this but if you are using the beta build of Google Chrome you can use the Instachrome extension. I have been using this extension for almost a month now and it makes adding pages to Instapaper a breeze.

Instapaper comes into its own if you have an iPod touch as the articles can be synced for offline browsing. As a serious user of Instapaper I recommend the pro version, I use folders and it helps to have them synced, saves having to repeat actions later as everything can be done from the iPod.

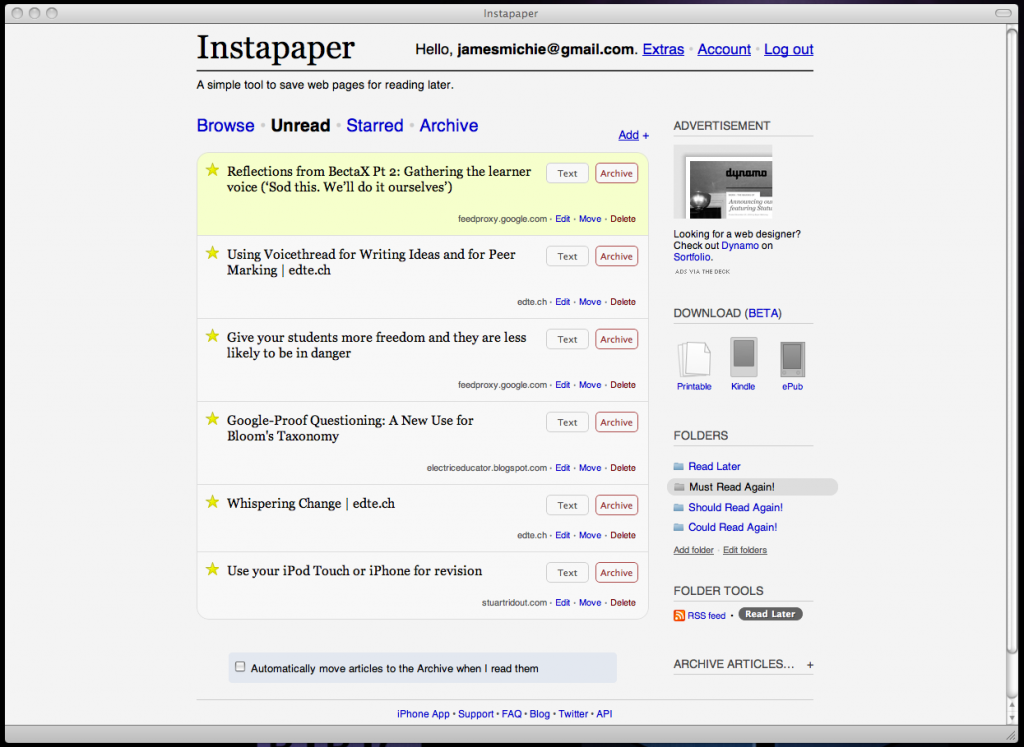
Here are the results of setting up Instapaper with Fluid:

instapaper

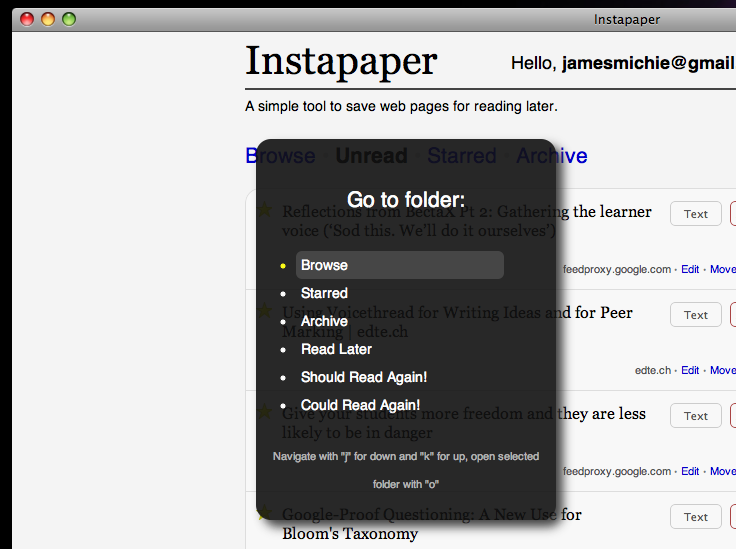
I didn’t stop with this one in simply creating the app I also installed a user script called Instapaper Beyond. It’s a script for Fluid created by Brett Terpstra which adds keyboard navigation and some special features. For example: (alt+g) brings up the “Go to folder” menu – just one of the very useful functions offered in this script.

instapaper beyond go menu

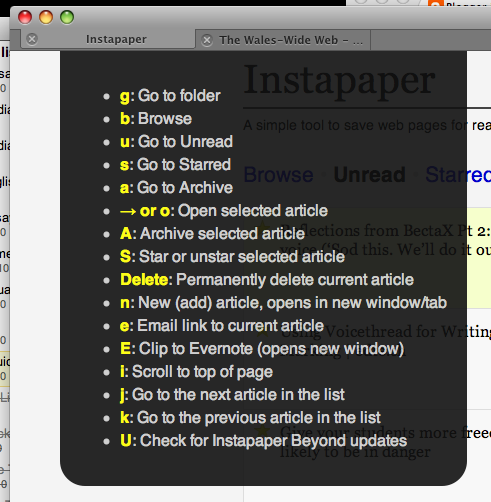
There are many more functions that make browsing Instapaper very enjoyable all of which can be controlled by the keyboard. Pressing (h) will bring up a full list of them.

instapaper keyboard navigation

And that’s it. Two apps that help improve my productivity and workflow when surfing the web. I think that I am going to create a stand alone Google Reader app as this makes up another integral part of my web workflow.

If you have any questions or want some advice about this process please e-mail me or tweet me @jamesmichie. Comments are always welcome.