Shipping, Giving Gifts & Combating the Email Onslaught

seth godin blogI finished reading Seth Godin’s Linchpin a few weeks ago and while I found it to be an interesting read, the main thesis of the text was nothing I didn’t already practise. I strive every day to “ship” and “give gifts” and I can’t evangelise enough on how important both of these concepts are as a teacher.

You have to “ship” because your day is filled with deadlines: lessons to be planned and taught, data to be input, reports to be written and homework to be marked. If you want the learning inside and outside of your classroom to be any good you have to “ship” on all of these tasks. Also, you have to “give gifts” because it’s good to be generous. Share what you do, not to get noticed and win promotion but to help make sure that every student gets the best possible education they can. I love to “ship”. I love to “give gifts”. Why? Because I care about learning. In fact, I love learning; it’s the reason I’m a teacher.

Shipping is fraught with risk and danger.

(Fear of shipping, Godin, 2010)

It’s easy to be afraid of “shipping” and “giving gifts” because many teachers are perfectionists and many teachers are protective about what they do.

  • What if every part of your lesson has not been meticulously planned?
  • What if you didn’t mark every essay in minute detail?
  • If you share an idea or a resource what if someone steals it and presents it as their own?
  • What if no one thinks what you are doing in your classroom is of any value?

To questions like these, I say remember it’s the students in your classroom that matter, so get smart. Digitise everything you do/use and back it up. Reuse and improve should become your personal mantra from day one. The better you get at this the more time you will have for the marking and data analysis which is (honestly) more important than much of the planning that you spend your time doing. What’s more, good formative assessment and understanding your students’ potential will ultimately lead to better planning any way. They inform each other and will lead to better teaching and better learning.

One of the keys for me, in ensuring that I “ship” on time is the way I deal with email. I, like many of you, work at a school where email has become the number one method of communication. However, the reality of this is that your inbox can have a stranglehold on your productivity as a teacher and certainly get in the way of the learning by impinging on the time you should be spending marking, planning and experimenting.

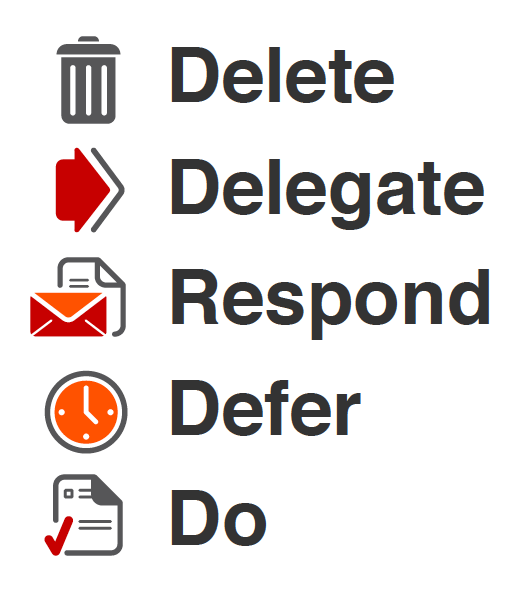
To combat the email onslaught I religiously use the following approach to email set out by Merlin Mann in Inbox Zero. Implement this into your work day when checking your email and your productivity will improve significantly, leaving more time for the marking, planning and most importantly the learning.
inbox zero

As for “giving gifts”: blog. Blog what you do, get a creative commons license and don’t let someone else show your ideas off. Do it yourself! Deliver CPD, sign up to present at a TeachMeet, build sessions into department meetings to share your ideas and encourage colleagues share what they are doing. If you take control of your gift giving you will find that you can (and will want to) share selflessly. Others will benefit but so will you.

To close, I will give a gift and allow Seth to have the last word:

A life spent curled in a ball, hiding in the corner might seem less risky, but in fact it’s certain to lead to ennui and eventually failure.

(Fear of shipping, Godin, 2010)

Connecting With Parents Online (Part Two)

After the success of our previous online meetings with parents, I decided that the format would be a good way to help the parents of Year 10 GCSE Media Studies students understand what their exam entails and how they should be revising for it.

The Year 10 cohort are the first group studying the new OCR GCSE Media Studies syllabus and it was decided that we would enter the students for the exam in Year 10. This will allow them to focus on coursework (controlled assessment) in Year 11. The coursework element is now worth 60%.

While I can’t show the recording of the presentation due to privacy concerns, below is the PowerPoint that I used. I tried to adopt the Lessig method of presentation, although at times I didn’t manage to be as succinct as I would have liked.

[iframe src=”https://docs.google.com/present/embed?id=ddtck3wr_179ddzzwqjp” frameborder=”0″ width=”410″ height=”342″]

And here is a screen grab of the meeting room. I stick to a standard layout allowing the PowerPoint to be the dominant feature on screen. There is a chat box in the bottom left which was used by the parents to ask questions after I had finished speaking. Above that is a pod which tells me who is participating in the meeting (I have blacked out the names) and in the top left is the Video feed.

connect room

Feedback was once again resoundingly positive, with all of the parents who attended the meeting praising us for our innovative approach to keeping them informed. What’s more they echoed the sentiments put across during the previous run of online meetings that it was lovely to be able to receive the information in the comfort of their own homes.

I believe that this form of parent/teacher interaction is highly sustainable and can only see that we will continue to develop its use during the next school year.

The access to and ease of use offered by Adobe Connect (via BucksGfL) has been integral to its success as there is no sign up required by the parents. They only need the link which we send out by email and/or postcards. A link is also placed on the front of the school website.

online meeting web banner

Like truly effective ICT use, we wish to ensure that this is as easy for parents as possible – we don’t want them to be turned away at the door!

Should you like to know more about the online meetings or our use of Adobe Connect please contact me by email or via Twitter.

Creating Desktop Apps With Fluid

fluid

My best and most recent tech find for Mac is Fluid. Fluid is an application that allows you to create standalone desktop versions of your favourite web apps such as Gmail or Twitter. Neither of these appealed to me as I have Gmail synced with Mail on my Mac, and on my iPod Touch (I also sync Google Contacts, Google Calendar and my school Outlook account) and I use TweetDeck to keep up with my PLN.

However, there were some web based apps that I felt would be great to have on my desktop due to the fact that it would be good to be able to view them within a separate interface. What’s more after doing a little more research I found that if I used Fluid to create apps I would be able to make use of user scripts to tweak them – that sounded great, so I decided to begin with Google Tasks as I am always looking for ways to improve my organisation and productivity.

Google Tasks

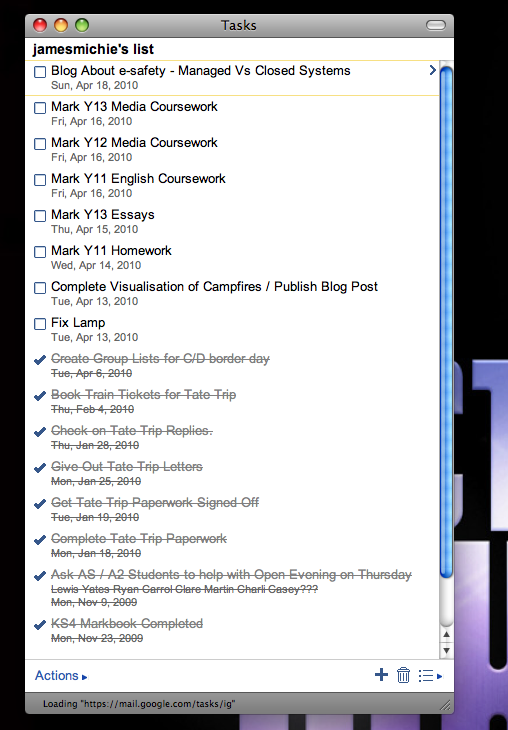
And here it is. It looks clean, signs in automatically and everything works: Adding tasks, adding info, marking when complete, syncing with Google Calendar and therefore Ipod touch.

tasks

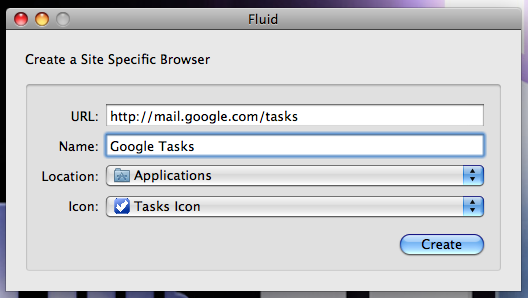
If you would like to do this you need to download Fluid. Once installed, open Fluid. You will see a dialog box (see below) into which you need to type or copy/paste the following URL: http://mail.google.com/tasks. Name the app Google Tasks. Keep the location as Applications. Download an icon to use, I chose one created by Max Headwound on Flickr (image below), found on the Flickr: Fluid Icons Pool. Then click “Create”.  You will see a new dialog box asking you to launch the app. Voilà, you are done!  You can then drag the app from the Applications folder to the dock.

fluid new app creation

tasks icon

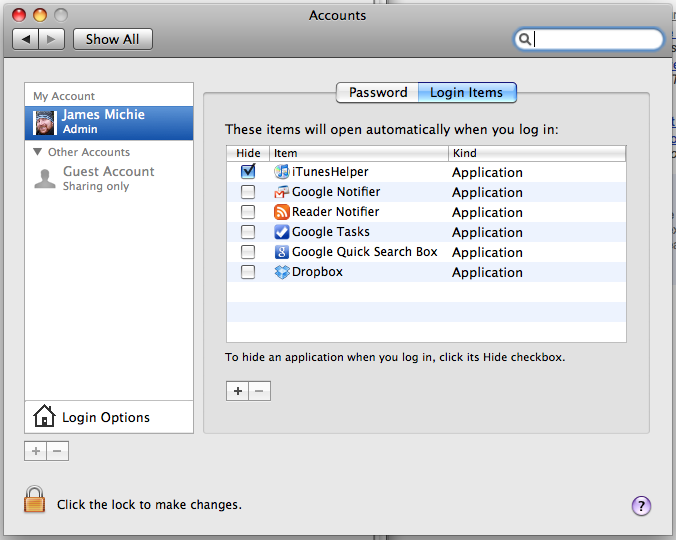
For ease of use I also added my newly created Google Tasks app to my login items so that it would load automatically when I boot up my Mac. To do this go to System Preferences / Accounts / Login items / Click the + symbol and select the Google Tasks app from the Applications folder.

login items

There are also some nice icons available at IconsPedia, choose the icon that suits you! As a Mac user image is important to me so selecting the right icon was as important as choosing which web apps I would turn into desktop apps. My next web based app that I use every day was Instapaper.

Instapaper

The process is the same as before using the following url: http://www.instapaper.com/u. If you have not used Instapaper before, I highly recommend it. It makes up an integral part of my web workflow, something I plan to write more about in a future post.

Instapaper allows you to store web pages and articles that you find to read later. It makes use of a bookmarklet to do this but if you are using the beta build of Google Chrome you can use the Instachrome extension. I have been using this extension for almost a month now and it makes adding pages to Instapaper a breeze.

Instapaper comes into its own if you have an iPod touch as the articles can be synced for offline browsing. As a serious user of Instapaper I recommend the pro version, I use folders and it helps to have them synced, saves having to repeat actions later as everything can be done from the iPod.

Here are the results of setting up Instapaper with Fluid:

instapaper

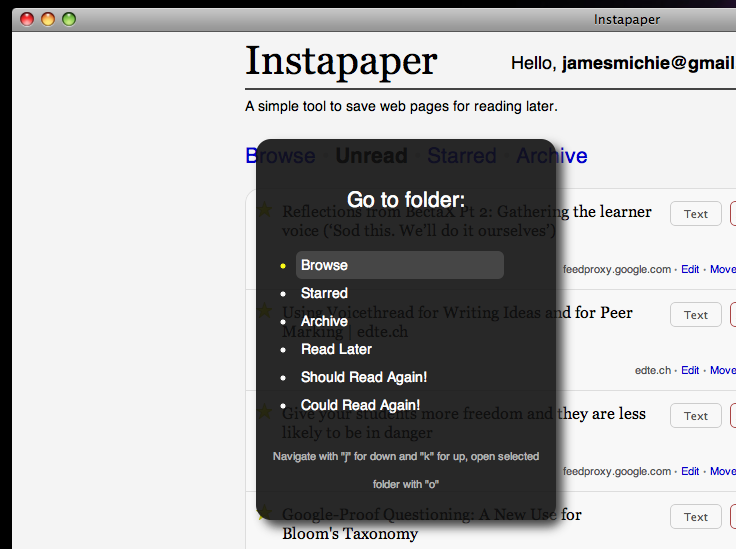
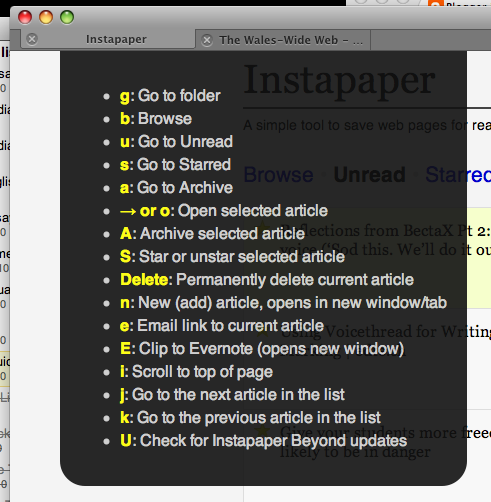
I didn’t stop with this one in simply creating the app I also installed a user script called Instapaper Beyond. It’s a script for Fluid created by Brett Terpstra which adds keyboard navigation and some special features. For example: (alt+g) brings up the “Go to folder” menu – just one of the very useful functions offered in this script.

instapaper beyond go menu

There are many more functions that make browsing Instapaper very enjoyable all of which can be controlled by the keyboard. Pressing (h) will bring up a full list of them.

instapaper keyboard navigation

And that’s it. Two apps that help improve my productivity and workflow when surfing the web. I think that I am going to create a stand alone Google Reader app as this makes up another integral part of my web workflow.

If you have any questions or want some advice about this process please e-mail me or tweet me @jamesmichie. Comments are always welcome.