Writing: From idea to published post

For the second time in less than a month I find myself inspired to write a blog post after sharing a screen shot via Twitter. Last time, it focused on how I was using Evernote to organise my notes for my MA. This time is slightly less direct in that the item I’m going to write about had nothing to do with why I tweeted out the screen shot.

T4M and NV

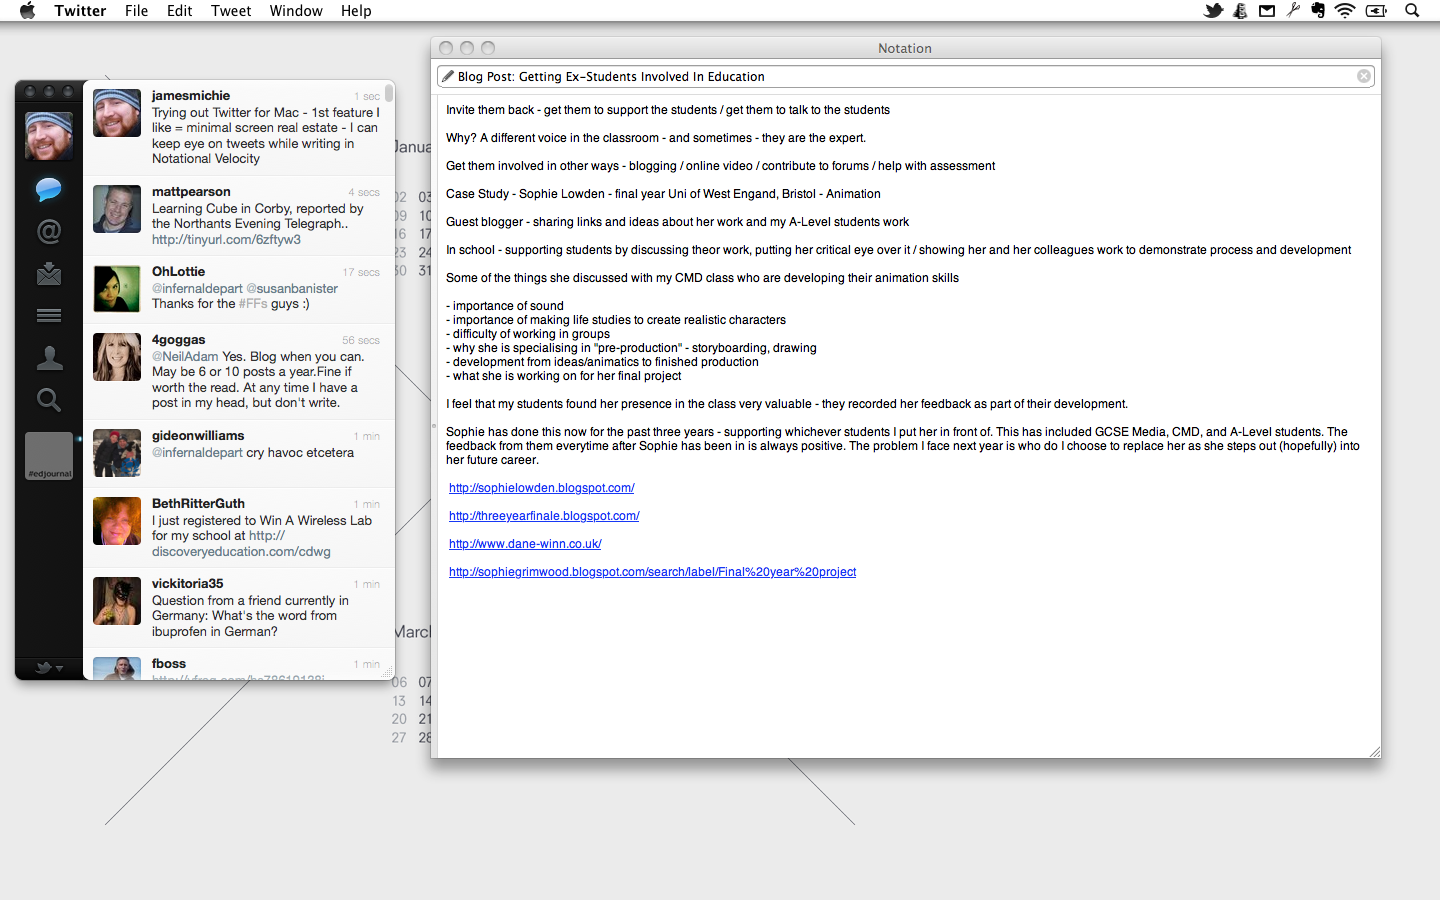
The screen shots purpose was to document the fact that I was giving Twitter for Mac a try and was enjoying the small amount of screen real estate that it consumed; meaning I could have other apps open and visible at the same time. In this case Notational Velocity. Not giving a great deal of thought to this at the time I grabbed the shot not realising that the image also offers an insight into my writing process. What is revealed in the image is the earliest written draft of a blog post. I call this the earliest “written” draft as the first draft is the version in my head. Rarely the version that ends up on my blog though.

Ideas for blog posts come to me at all times of the day, from many different directions, but more often than not – after a day of work. At that time I’m not usually at my most productive so save writing posts for the morning or weekend. What I do though is write down the idea, usually as a series of points. This some times translates directly into the paragraphs that will make the post and other times the final post has no resemblance to the initial idea that was written down.

Most of the posts on this blog have gone through either 3 or 4 drafts. After making my notes (draft 1) I will leave the idea to simmer a little. I then return and flesh it out (draft 2). This is all done in Notational Velocity. At this stage I may have collated some links but certainly have not thought about visuals if I choose to use them at all. I have simply focussed on the writing – the most important part IMO.

If I am happy with this draft I will copy and paste it into WordPress, add all of the links and any images/media that is to be included; check the code; add categories and tags; and voila a post (draft 3) ready to be published. From time to time however I will get this far, read back over the post and decide that something is not quite right. If that is the case I will leave the post as a draft for 24 hours and return to it with fresh eyes. Nine times out ten I will realise what was niggling me, correct it and then hit publish (draft 4).

There are times that I’d like to be one of those prolific bloggers who posts daily, pushing out first draft after first draft but I just can’t do it. Partly because I’m a perfectionist and partly because many of the things that I choose to write about need a little gestation time. That said, I have found using Posterous for a more personal / non #edtech blog has given me a bit more freedom to post with a little less need for polish, but then that blog is not as widely read as this one.

Writing is a very personal process – it deserves focus, time and more than a little TLC. F,or anyone who is thinking about starting a blog the most important things you must do early on are: 1. Find a writing methodology that works for you and: 2. Find the right writing tools that will help you focus on the writing, whether that be pen and paper, direct into your blogs editor or on a dedicated writing app. Making your blog/posts colourful; embedding media; adding buttons and feeds are not as important as the writing. All of the bells and whistles can be built up over time but for people to return to your blog regularly the writing must be good.

Sharing What You Do Online – FTW!

A little under two years ago I had been teaching for six years but had not considered keeping a blog and I wasn’t on Twitter. Both of these outlets have had a significant impact on my teaching and the learning that takes place in my classroom. This morning I was reminded of just how valuable sharing what you do online is.

Catching up with tweets during New Years Day, I decided, very much on a whim, to have a go at a #365 project. A 365 project is where you take a photo a day for 365 days. I already had a Posterous blog set up that I had been using for posting photos and thoughts that didn’t really fit on this blog. Therefore, I had to do little more than start adding the photos. Having had a significantly hectic day yesterday, I got home, ate dinner and then, while working on my MA realised that I had not posted a photo for the day. In fact, I had not taken any photos at all during the day and there was nothing on my phone or laptop that I felt like posting. Instead, I decided that I would simply post a screen grab of what I was working on at that moment.

Evernote and MA

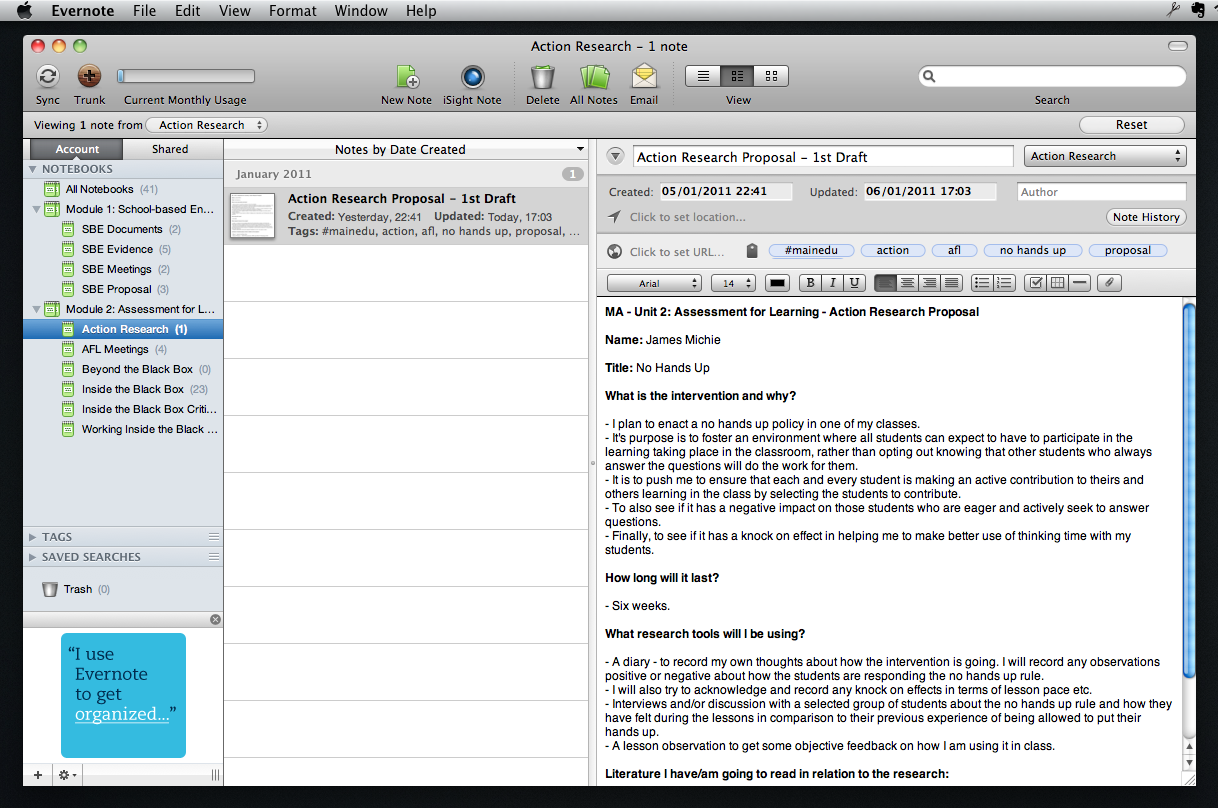
As you can see I am using Evernote to organise my MA. I have folders set up for each module and within those folders I have note books where I have recorded meetings, research proposals, notes on readings etc. I shared this on a whim, more out of ensuring that I kept up with the #365 project than anything else. I didn’t expect anyone to really look closely at the image. But in this I was wrong. If you zoom in on the image you will see that I was working on my ‘Action Research Proposal’ for my ‘Assessment for Learning‘ module. I have decided to put a ‘No Hands Up’ policy in place with two of my classes. This morning, checking my email, I saw that I had a comment from Christine Roberts (@Christiner733). She shared with me how she deals with the idea of ‘no hands up’ in her classroom and also shared her feelings on how her students respond.

365 Comment

What had been for me more a formality of keeping up with my #365 project; an innocuous post which had no intended outcomes, led to the sharing of good practice and ideas. Once again proving that sharing online is valuable.

For those of you who are not into your acronyms – FTW stands for ‘For The Win’ and I believe this to be true of sharing what you do online. Take the time to reflect on the teaching and learning that takes place in your classroom. There is no better way to do this than to write about it – IMO! Blogging is so simple, particularly with platforms such as Tumblr and Posterous that require almost no set up or web expertise to get started. And join Twitter, there are a plethora of talented and genuinely nice people out there who are willing to share ideas and help you grow as an educator.

In these tough financial times, the sharing of ideas and resources online may just well be the best way forward…

4D Books, Cover Work and a Retweet – QR Codes in Education

Continuing the narrative on QR codes David Mitchell, this past week, took to stage at #tmbpool3 demonstrating how he has used QR codes to connect the myriad of online content produced by his students to the work they produce in their books. Using a beautifully designed Prezi and actual students books he showed how he was addressing the problem of evidencing where work and assessment is happening for parents, Ofsted, and more importantly for the students and themselves as educators. The post, titled: ‘Introducing 4D Books – Linking analogue to digital‘ is well worth the read.

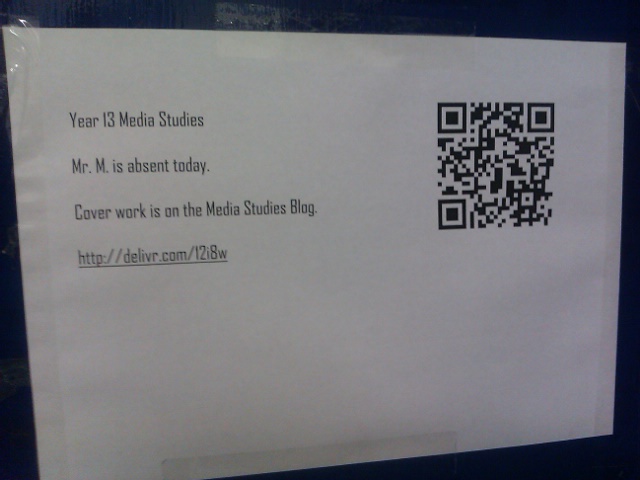
In controast to David I have been taking a more gradual approach to QR codes. I have simply begun to include them in a variety of places over the last couple of week. I have added some to the VLE providing links to blogs or useful websites for Media and English students. I have added some to my lesson presentations such as on homework slides and I also left a link to my cover work, via a short url and QR code, on my classroom door while I was out of school on Friday. See below.

I have not actively engaged the students as a whole class in using them yet but simply encouraged students who  have a QR capable phone to download a free app and scan the code to see what happens. The response has been positive and by the end of two weeks some students scan the code on the homework slide rather than copy all the info down into their diary. I am going to continue with this approach while I am in the process of developing a whole class activity for my Media Studies class (more on this in the near future).

Finally, David Hopkins retweeted a link to a page on the blog: ‘Web2 tools for in the classroom’ about QR codes. On the page there are a variety of links to useful posts and a clear explanation of what QR codes are, with some useful ideas on how they can be used in education. I certainly like the idea of students including QR codes in their assignments to send me the teacher to a useful resource.

Want to know more about QR codes in education? The read my most read post ever!

If you have been using QR codes or have ideas please comment below or share via Twitter with the hash tag: #qrcode

QR Codes in Education: A Burgeoning Narrative

Since I last published thoughts on how QR Codes could be used for learning in a short audioBoo (click the link or scan the QR Code on the right), there has continued to be a growing and significant buzz about QR Codes on Twitter and in the blogosphere. A narrative is developing as ideas, experiences and best practices are shared and discussed.

The ball got rolling at TeachMeetX where Julian S. Wood delivered a thoroughly engaging presentation on storytelling and QR Codes. I couldn’t be there in person but was fortunate to catch most of what Julian had to say via UStream. What struck me during the presentation was not the quality of the tech but the pedagogical principles that underpinned the activities putting the technology where it belongs: at the heart of making the learning happen but not directing it. Hopefully, the video of the presentation will be available soon and everyone can see it. One of the tools that Julian used was Delivr which I have written about here and will mention again later in this post.

A couple of days later I was catching up with Twitter and dropped in on a discussion that was taking place about QR-Codes. Dughall McCormick tweeted out a link to a blog post he had written about QR Codes and an app called stickybits – see Tim Ryland’s article here for more info on that. Dughall shared a variety of ways that QR Codes/stickybits could be used, all with their various merits and implications. My personal favourite was this:

Stick a code on the front of a pupil’s exercise book. Feedback can be added in any format as time goes on. This can be done by peers, the student, teachers, parents etc. The same could be done for homework presumably

This struck me as immediately pertinent as there is a huge drive on assessment for learning and the marking of work in my school at the moment, what with Ofsted just around the corner. More importantly it is one of my many beliefs, in relation to education, that assessment can be a driving force in improving a students progress and attainment. This may be one way that I myself experiment with QR Codes and/or stickybits.

Dughall finished by sharing a few other useful links including a collaborative guide produced by Tom Barrett et al. about using QR Codes in the classroom. It is part of his excellent Interesting Ways series and so far there are 14 different ideas about how to use QR Codes.

Also mentioned by Dughall and tweeted out the same day was a post by the ever innovative David Mitchell – blogging about his use of QR Codes with his Year 6 class.

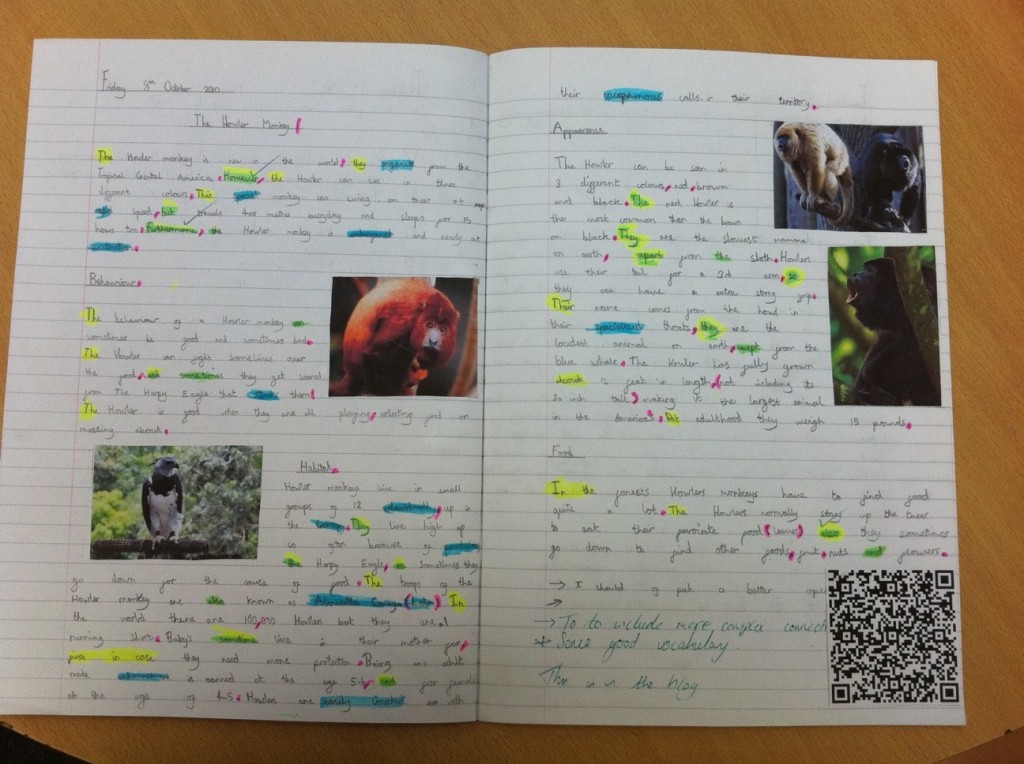
He explained and demonstrated through photos how they had been used. Essentially his students had drafted a piece of work in their books. They then wrote up their work on their class blog and generated a QR Code from their blog post’s URL. This was then stuck into their books. Instantly the gap between analog and digital work was bridged (or as David put it: “A Literacy book suddenly becomes an interactive book of weaved magic!”).

By allowing anyone to scan the code and see the final draft of the work while looking at the first draft it changes the engagement and interaction with the students work bringing the student, teacher, parent closer to creative and developmental process. A clever and highly effective use of QR Codes I think.

Below is an example of one of the images from David’s post – click to zoom and then scan the code – it really works!
As the discussion continued on Twitter over the next couple of days more and more resources and posts related to QR Codes began to come to light, demonstrating the fact that the technology is not that new and that educators have been toying with it for a while now.

One such post that was tweeted was from Ollie Bray who had written about QR Codes (back in 2008) in a post titled: iPhone in Education – Using QR Codes in the Classroom.

In his post he details how QR Codes work with some clear broken down screen shots. Towards the end of the post Ollie makes a couple of suggestions about potential uses but overall it stands as a good post for QR Code novices to help them understand the basic principles.

This was followed by a link to a PDF document (hosted by the EDUCASE Learning Initiative) titled: 7 Things You Should Know About QR Codes (written in 2009). The document is well structured and concise (2 pages), offering answers to basic questions like: “What is it?”, “How does it work?”; to more complex ones like: “What are the implications for teaching and learning?” This is a good starting point for QR Code novices. Download here.

There were a few more posts that were dragged up from the archives but I will not comment on them all here. A Twitter search for QR Codes should provide some useful results.

The final post I wish to discuss is fresh and new and was only published this week, on October 26th, over at the blog of David Hopkins – Don’t Waste Your Time. Titled: QR Codes: It’s not all about the phone, you know. David offers up three potential applications that could be used to scan QR Codes from your desktop computer. This was interesting and I am going to download and play with the Desktop QR Code Reader myself.

Reading David’s most recent post though led me back to his many other posts about QR Codes, some of which I had read through a few weeks ago when I had just begun to look at QR Codes myself. I felt that I would re-mention the post: QR Codes in the Classroom. The explanation and suggested uses are very good but even better than the written word is the video David has included of QR Codes in action. Scroll through the post, find the video and give it a watch. If you are still unsure about the potential of QR Codes, you won’t be after you have watched the video.

With a growing list of potential uses and some very well thought out pedagogical approaches I believe it’s fair to say that this technology is worth investing the time in. To get started with my own use of QR Codes I am going to focus on two areas:

1. Creating a class project based around similar principles to those presented by David Mitchell. I really felt the simplicity of linking physical writing with online content was an interesting notion that warrants further exploration.

I need to give it more consideration but I see excellent opportunities here to connect the creative/tactile freedom of my classroom with some of the tools that I already use with my classes online. One idea that came to mind was to get my students to collate a variety of useful material on a Lino It canvas, generate a QR Code for their wall. Then back in the classroom preparing for their controlled assessment they could scan the QR Code (now stuck in their books) to access that information.

Once I have planned the activity better and have the results I will certainly blog and share it.

2. Educating students, parents and fellow teachers on what QR Codes are and how they can be of use inside and outside of the classroom. I think there is an opportunity to share simple info like revision tips, short helpful videos and other similar materials. In principal this is straight forward as I have seen several good examples of QR Codes being used. One of the keys is to include info on how to scan the codes and where to get an app to do it.

With this in mind I found this clip from CSI on YouTube. It provides a fairly clear and engaging explanation of what a QR Code is.

I have shared it via Delivr which displays it on a dedicated page making it easy for it to be reshared. What’s more, as I mentioned in my blog post about Delivr when viewed on a mobile phone the page is optimised for mobile screens.

The success of sharing info in this way will be more difficult to judge than within the controls of a classroom based activity. This is why I will be using Delivr to generate the codes. Signing up for an account allows you to track the QR Codes you create. I will be able to get instant raw data on whether the codes are being scanned.

Again I will blog and share the results.

Before I close this post I will share one more useful link. There are several pages on the web that help you find the right QR Code reader for your phone but I felt that this one from PercentMobile was the most effective. Simply select the manufacturer and handset model that you own and it then provides you with a link to an app that will work with your device. Get out there and get scanning.

If you have anything to add to the QR Code narrative, perhaps you have experimented with them in your classroom; or you have a useful resource to share; or you have read a good blog post then please share it via Twitter using the hash tag #qrcode or reply to this post.
Notational Velocity – Freedom To Write!

Very recently, Leo Babauta (he of zenhabits.net and mnmlist.com) published a post about his use of the free Mac application Notational Velocity. In the post he discusses how the app has become his number one writing tool. I also mentioned NV in a recent blog post and even though I have only been using it for a few weeks, I find myself using it far more than I expected to. I began by using the app to make notes and simple lists but have found myself drafting blog posts, letters and recording ideas that I can return to later. Therefore, I felt that I would offer some further refelections and explanation of why I like the application so much.

Notational Velocity is one of the most uncomplicated and yet most powerful tools I have made use of.

Simplicity

First and foremost it was the simplicity of NV’s design that grabbed my attention. The user interface boasts a clean writing space, free of the clutter you find in so many desktop text editors. There are no buttons as the app relies on simple search operators and a series of built in shortcuts (not an extensive list) to operate. At the top of the app is the location bar (which you can return to at any time by clicking cmd-L) – here you add new notes (type a title and hit return) and/or search for and within notes. ‘Search’ functions much like Google instant, sifting through your notes, revealing the results as you type. Below the location bar is your list of notes, sortable by ‘title’ or ‘date added’. And below this is the note body, an open space, ready to be filled with text and nothing else. I, like Leo, have expanded this area to make it more useful for writing.

Beneath the simplicity of the UI are some very straight forward but useful inner workings. By entering your Simplenote username and password, notes are synced to your Simplenote account. It’s free and updates regularly. Also, built into the app is an auto-save function meaning you never have to worry about losing what you have written – I have mine set to sync every minute as I write at quite a rapid pace. Finally, you can (if you wish) tweak features like the typeface and font size. However, I was more than happy to stick with the defaults when after starting up the app for the first time I was overjoyed to be greeted by Helvetica, size 12.

Power

Woven within the simple exterior and inner workings of the app, NV holds immense power: the power to free you from distractions, allowing you to focus on your writing. As I’ve already mentioned my original intentions were to simply use NV to keep lists and notes that I could mail to myself or expand upon in Google docs. However, the app has become far more than a simple note making tool. I am using it to write almost everything – at least in the early draft stages. Why? Becuase the simplicity of the UI allows me to focus on the content of my writing. Having resized the app from its default setting I have created a focussed space for me and my thoughts. It is lovely to get my ideas down, free of the tools and buttons used to tinker with font size or to insert images. My time and attention remain firmly focussed on the task at hand: writing.

After just three weeks I am now using Notational Velocity for the following:

Notes

  • Mentor meetings – with my line manager and those that I take during meetings with my own mentees
  • Subject Leader meetings
  • Department meetings – my prepared notes plus those I add during the meeting
  • HTML code snippets – that I use in my blog posts

Lists

  • Work To Do – a constantly updated list of day-to-day tasks
  • To Read – a list of books I wish to eventually buy/download and read

Thoughts and ideas

  • Blog ideas – a continually changing list of potential posts that increases and decreases as I have new ideas and publish posts
  • Educational ideas – possible activities, uses for tech etc, that are not yet fully formed but have potential for development

Blog posts and other writing

  • Blog posts – currently, I have 4 blog posts (not counting this one) roughly drafted
  • Letters – I drafted a recent news letter and am currently recording notes for a second installment to be sent out at the end of term
  • Resources – I am also part way through drafting an exemplar response to an an activity I plan to assign my Year 10 English class

And that’s the thing, I really have started using NV for everything. I feel liberated, free of distraction, free to focus on my writing. Added to which I have become even more productive, writing everything from within one space – no switching between apps for different tasks. I do it all here, only moving to Word or Google docs when there is a need for formatting or the addition of other media. Those (for me at least) are the after thoughts; the window dressing – it’s the words that do the talking!

In a world dominated by tools and products that allow you to do multiple things at once, Notational Velocity is a reminder that sometimes simple is best.